Adjusting Intel Quad-Core ULV CPUs

After the years of stagnation, Intel eventually released quad-core ULV CPUs for notebooks. But the price for 2 additional cores is quite high since these CPUs are still limited to 15 W (or 25 W on some notebooks depending on the manufacturer). In order to give air for these cores, all cores have to work at low frequency, which explains why these CPUs have so low base frequency, sometimes making them even worse than 7 years old QM CPUs.
Fortunately, Intel allows to configure their CPUs, so it might be possible to increase the limits, which with a fortuitous turn of events allows to outperform 7th gen HQ CPUs still being more power efficient. In this post I’d like to describe how I increased the efficiency of cooling system in the most safe and durable way, adjusted 8th gen CPU I have (i7-8650U) in my ThinkPad, and then show some insane benchmarks.
Update, February 08, 2019. It appears that my first attempt of applying liquid metal wasn’t good enough which led to high spread of core temperatures. I reapplied the liquid metal and updated some plots and screenshots.
Applying the Liquid Metal
Liquid metals are much more efficient than regular thermal paste in terms of thermal conductivity. Using the liquid metal allows to significantly increase thermal conductivity of notebook’s cooling system, so I decided to try to apply it. Nevertheless, using liquid metals as thermal compound poses some risks.
Protecting the Heatsink
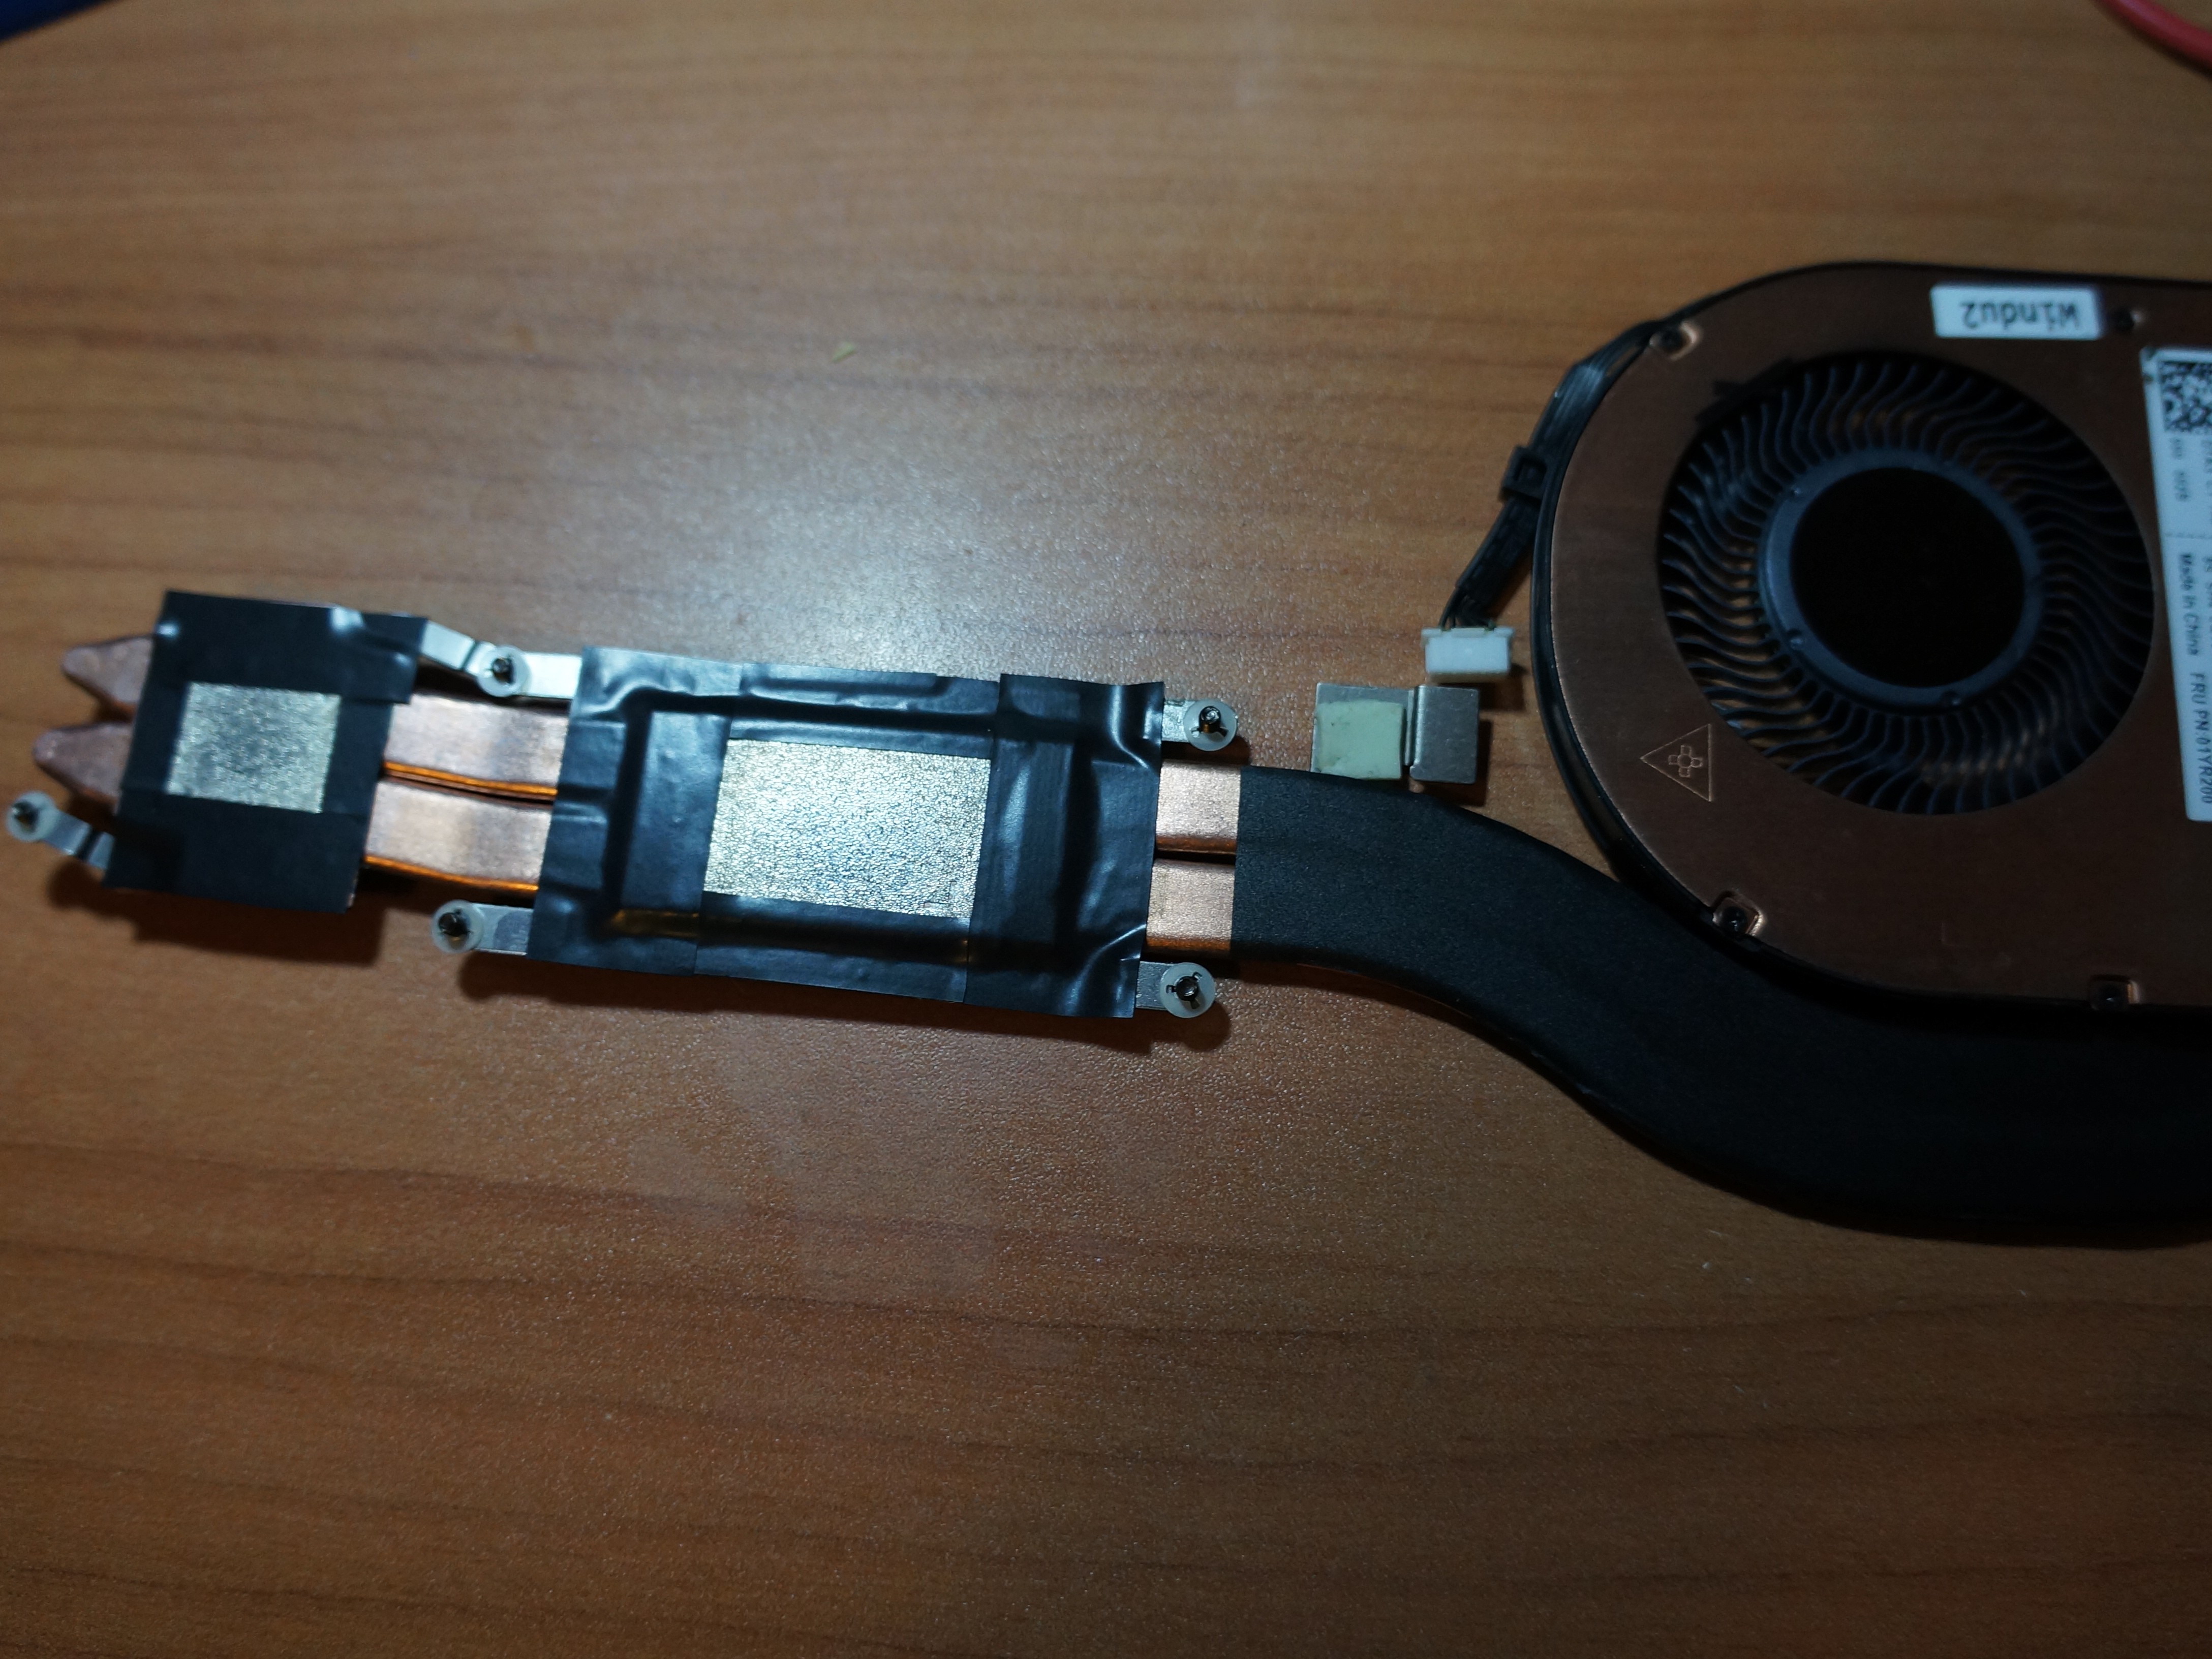
Liquid metals damage aluminium heatsinks, so they can be used only with copper ones. However, liquid metals react even with copper, although it takes significantly much more time. In order to protect the heatsink, I decided to plate a nickel layer on it since liquid metal is far less reactive with nickel.
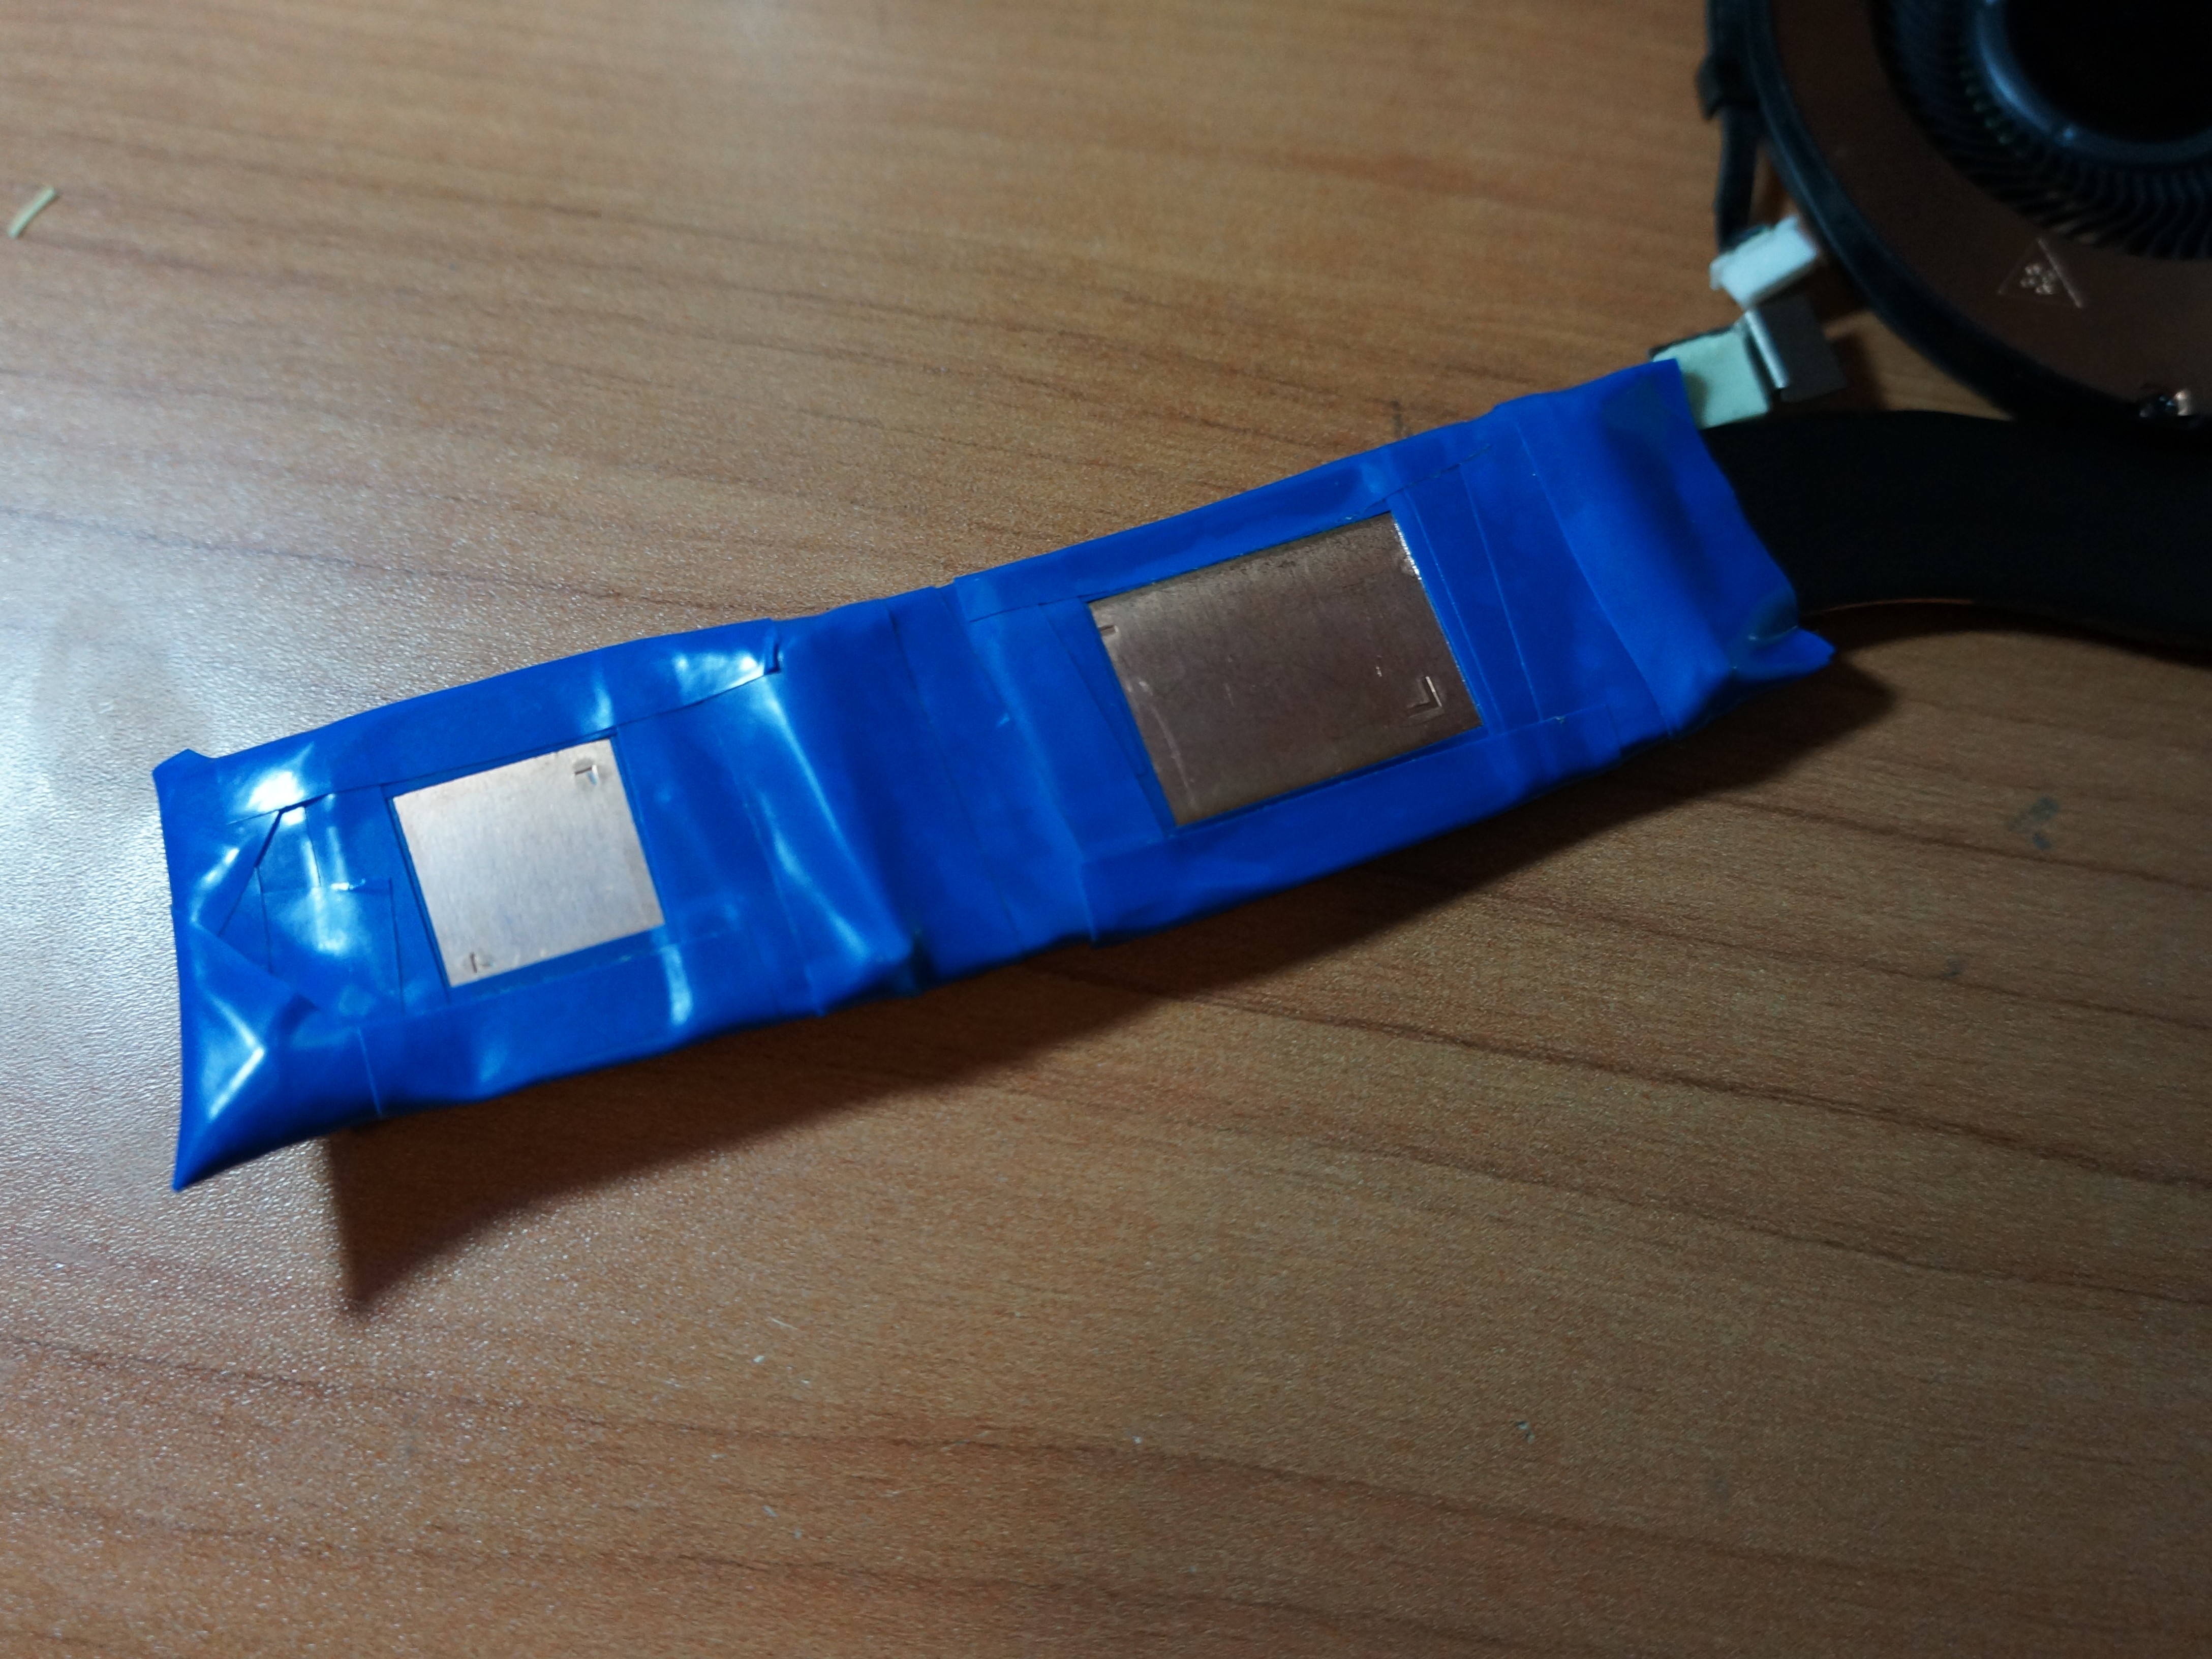
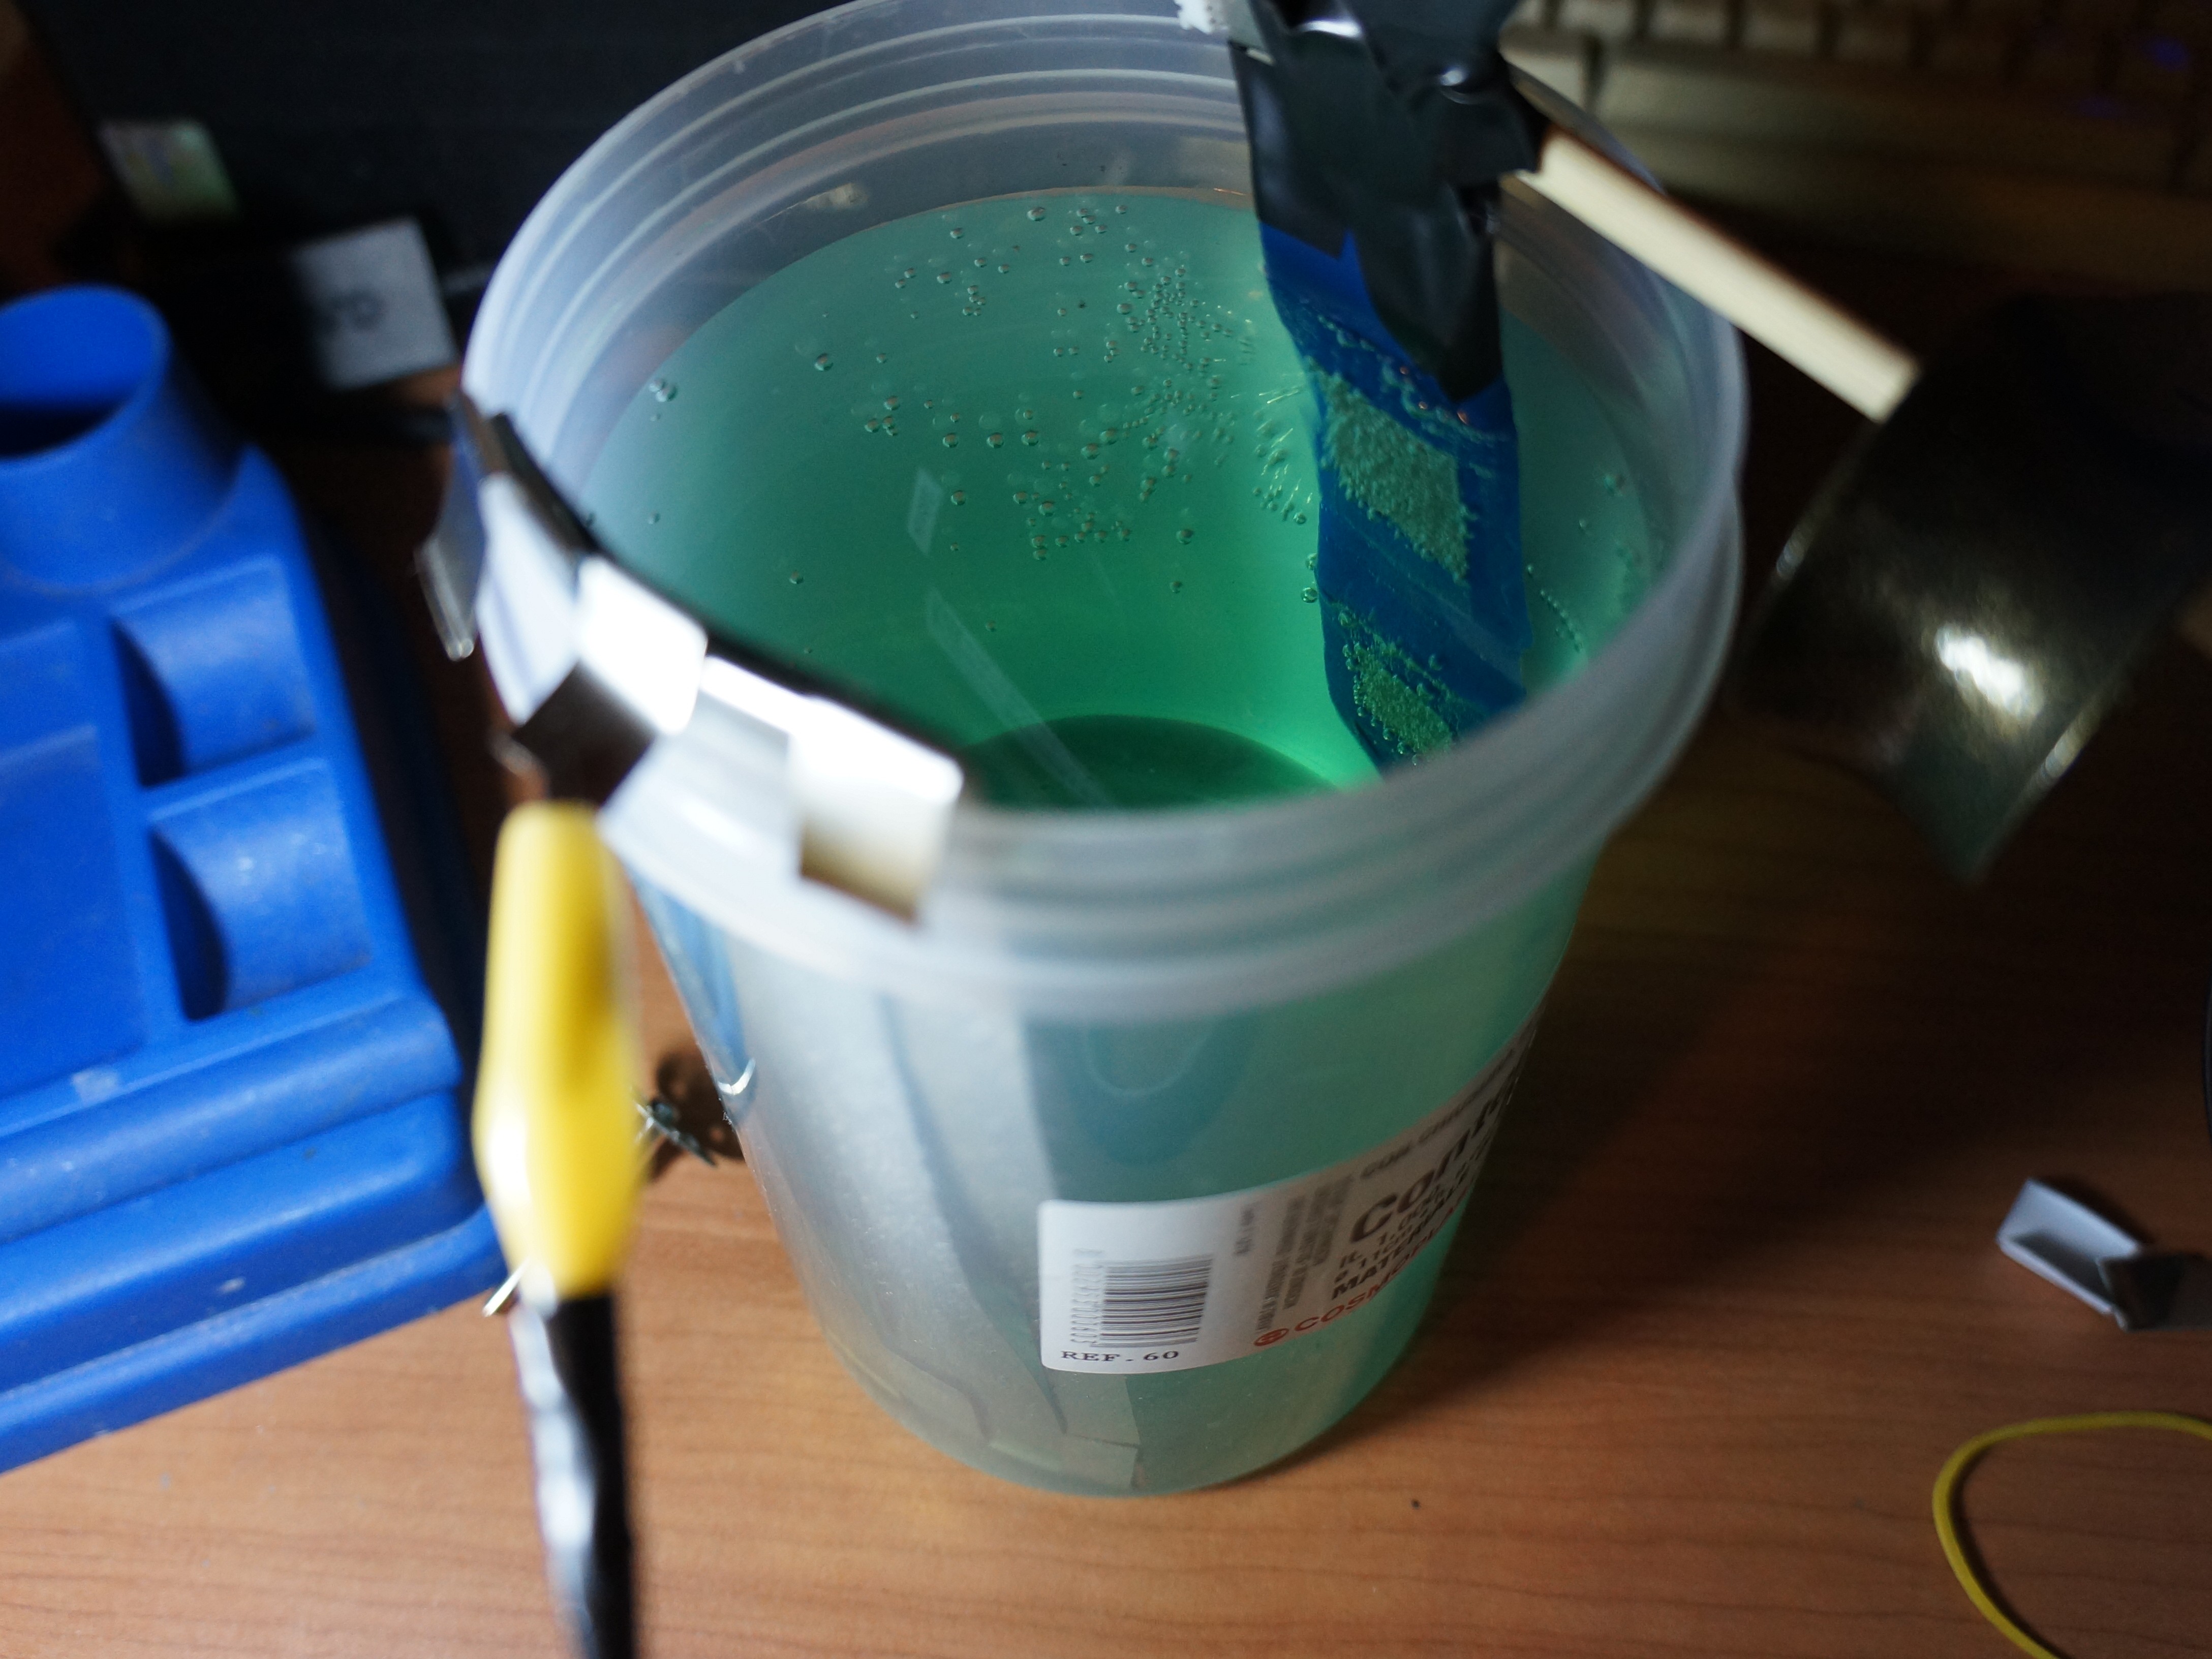
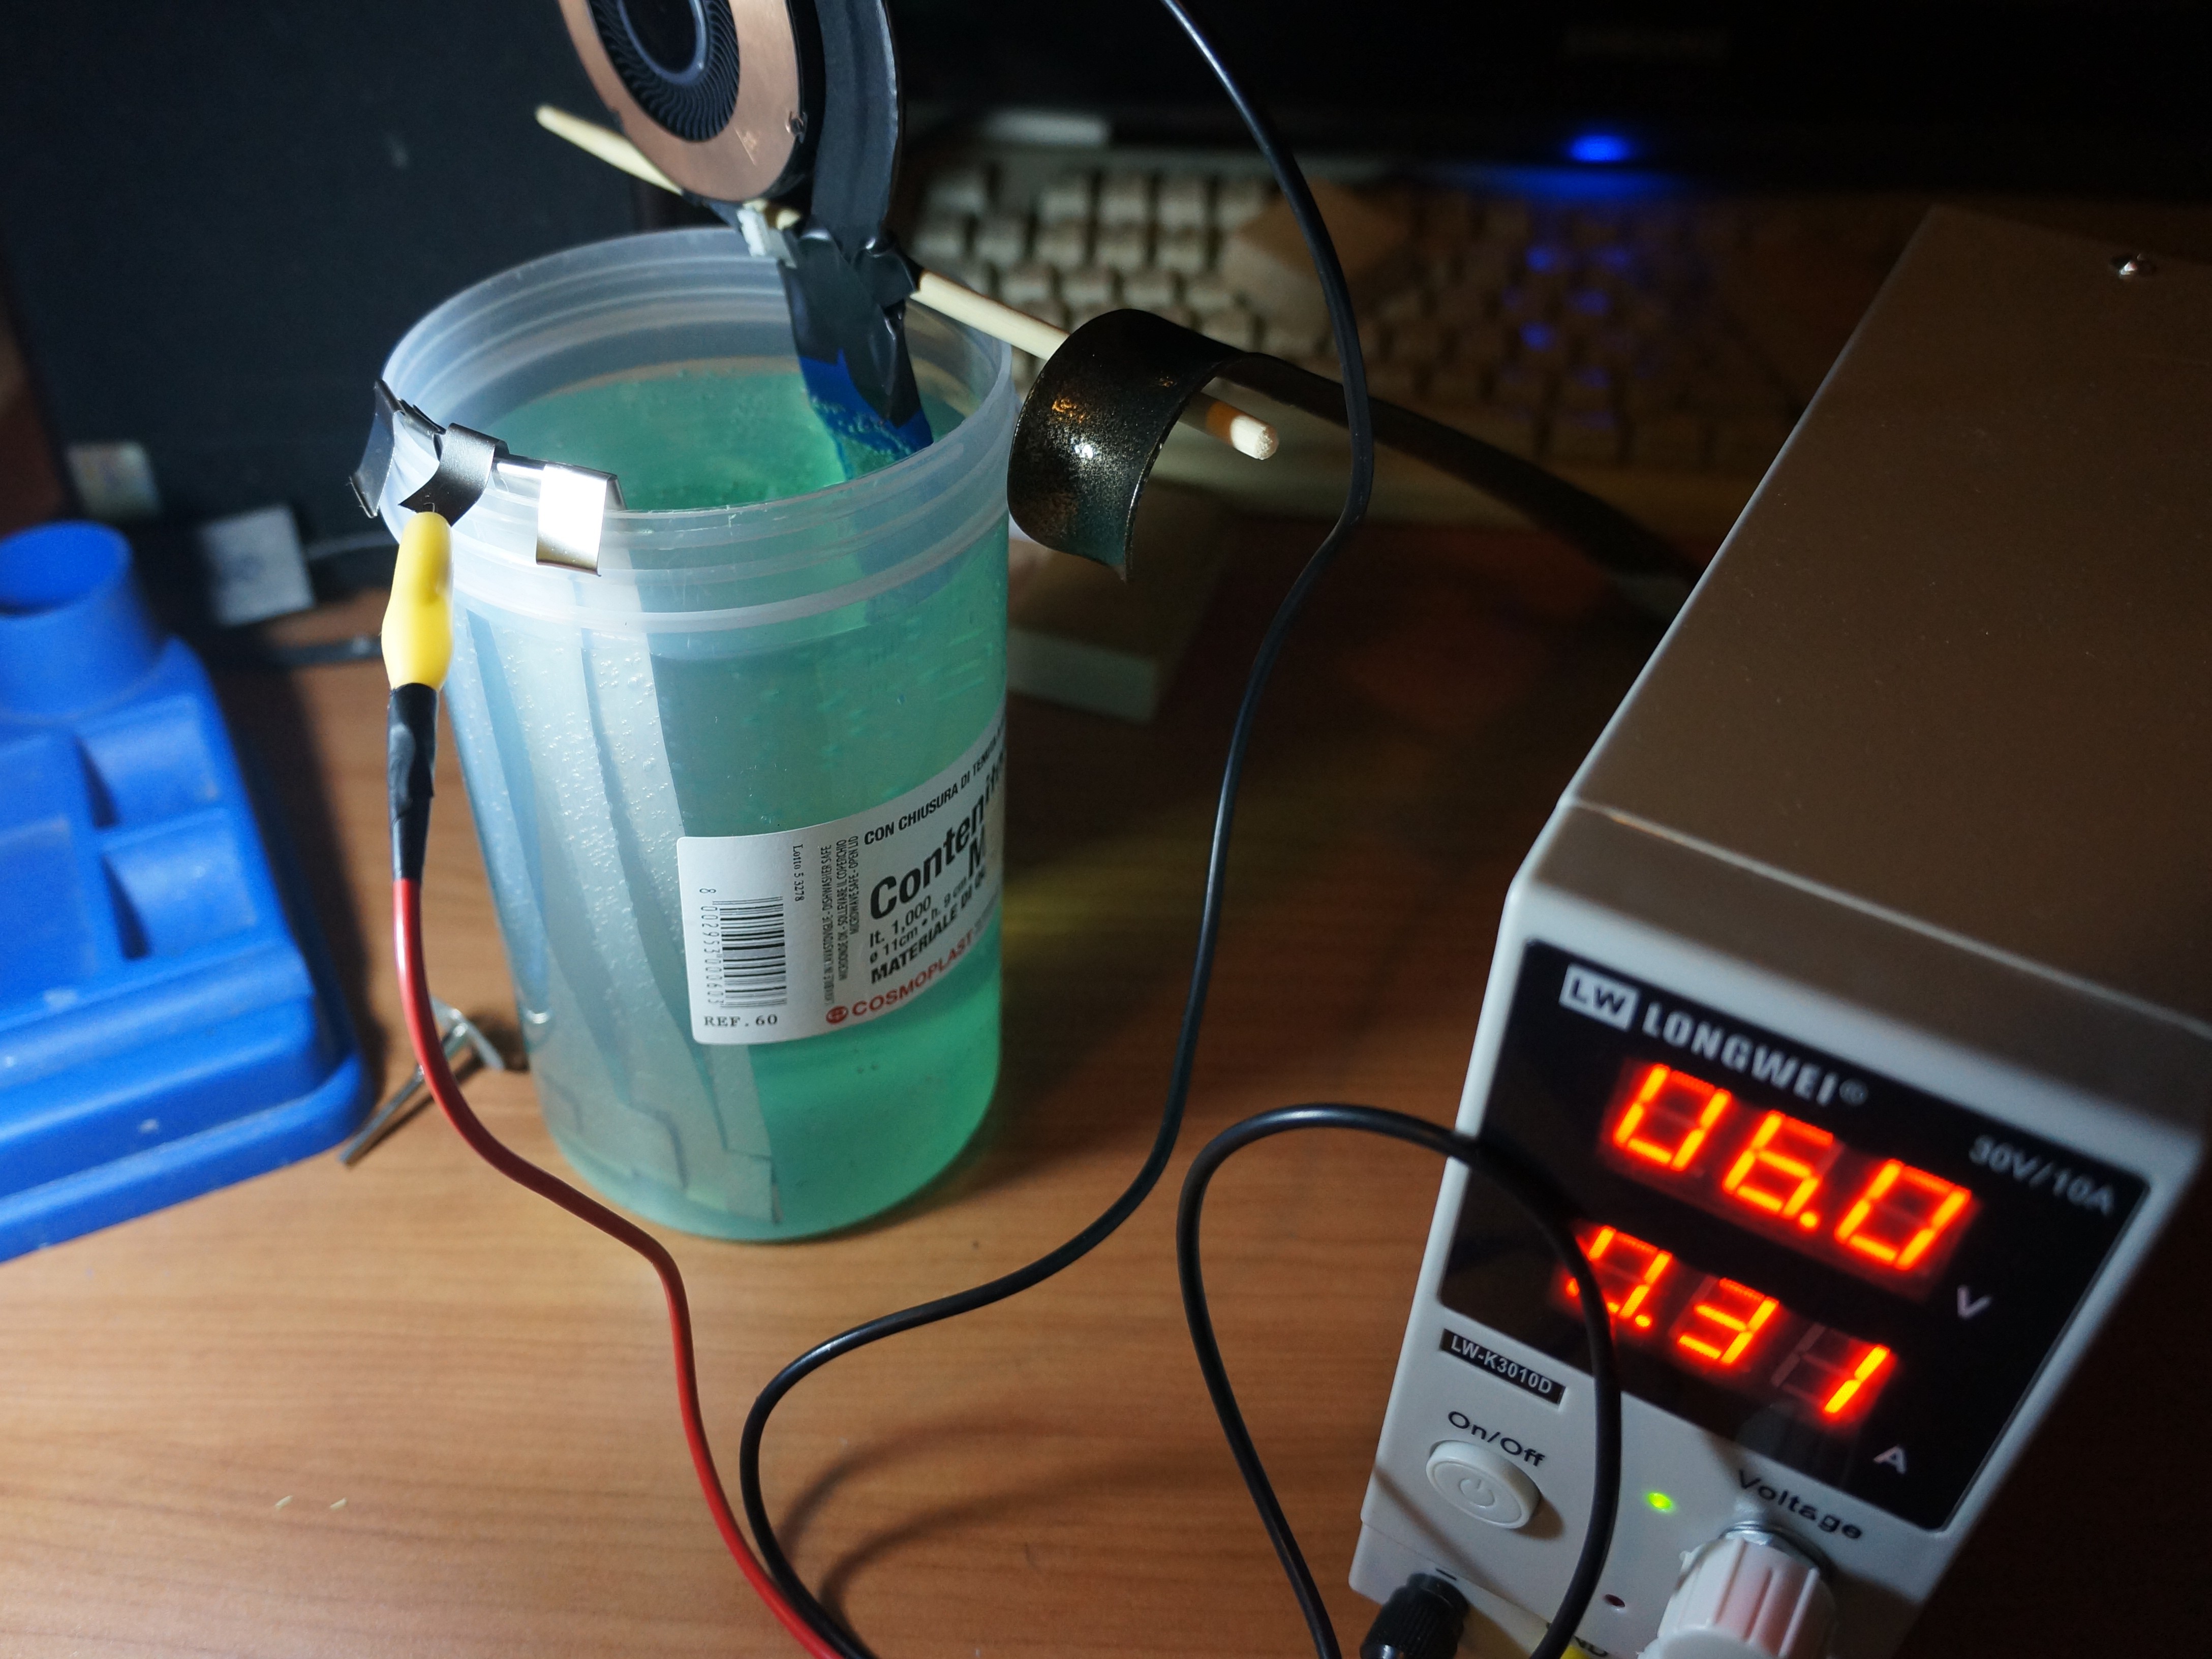
So I decided to perform electroplating since it’s pretty simple way. All I needed is nickel (I bought a nickel welding tape for this) and AC power supply (5 V and 1 A is enough for this). First I insulated the heatsink on both sides so the nickel would be plated only at the bare areas (photo 1), then I dipped the heatsink into nickel acetate solution, which I made from nickel tape and vinegar beforehand, and then I connected the power supply (photos 2 and 3).
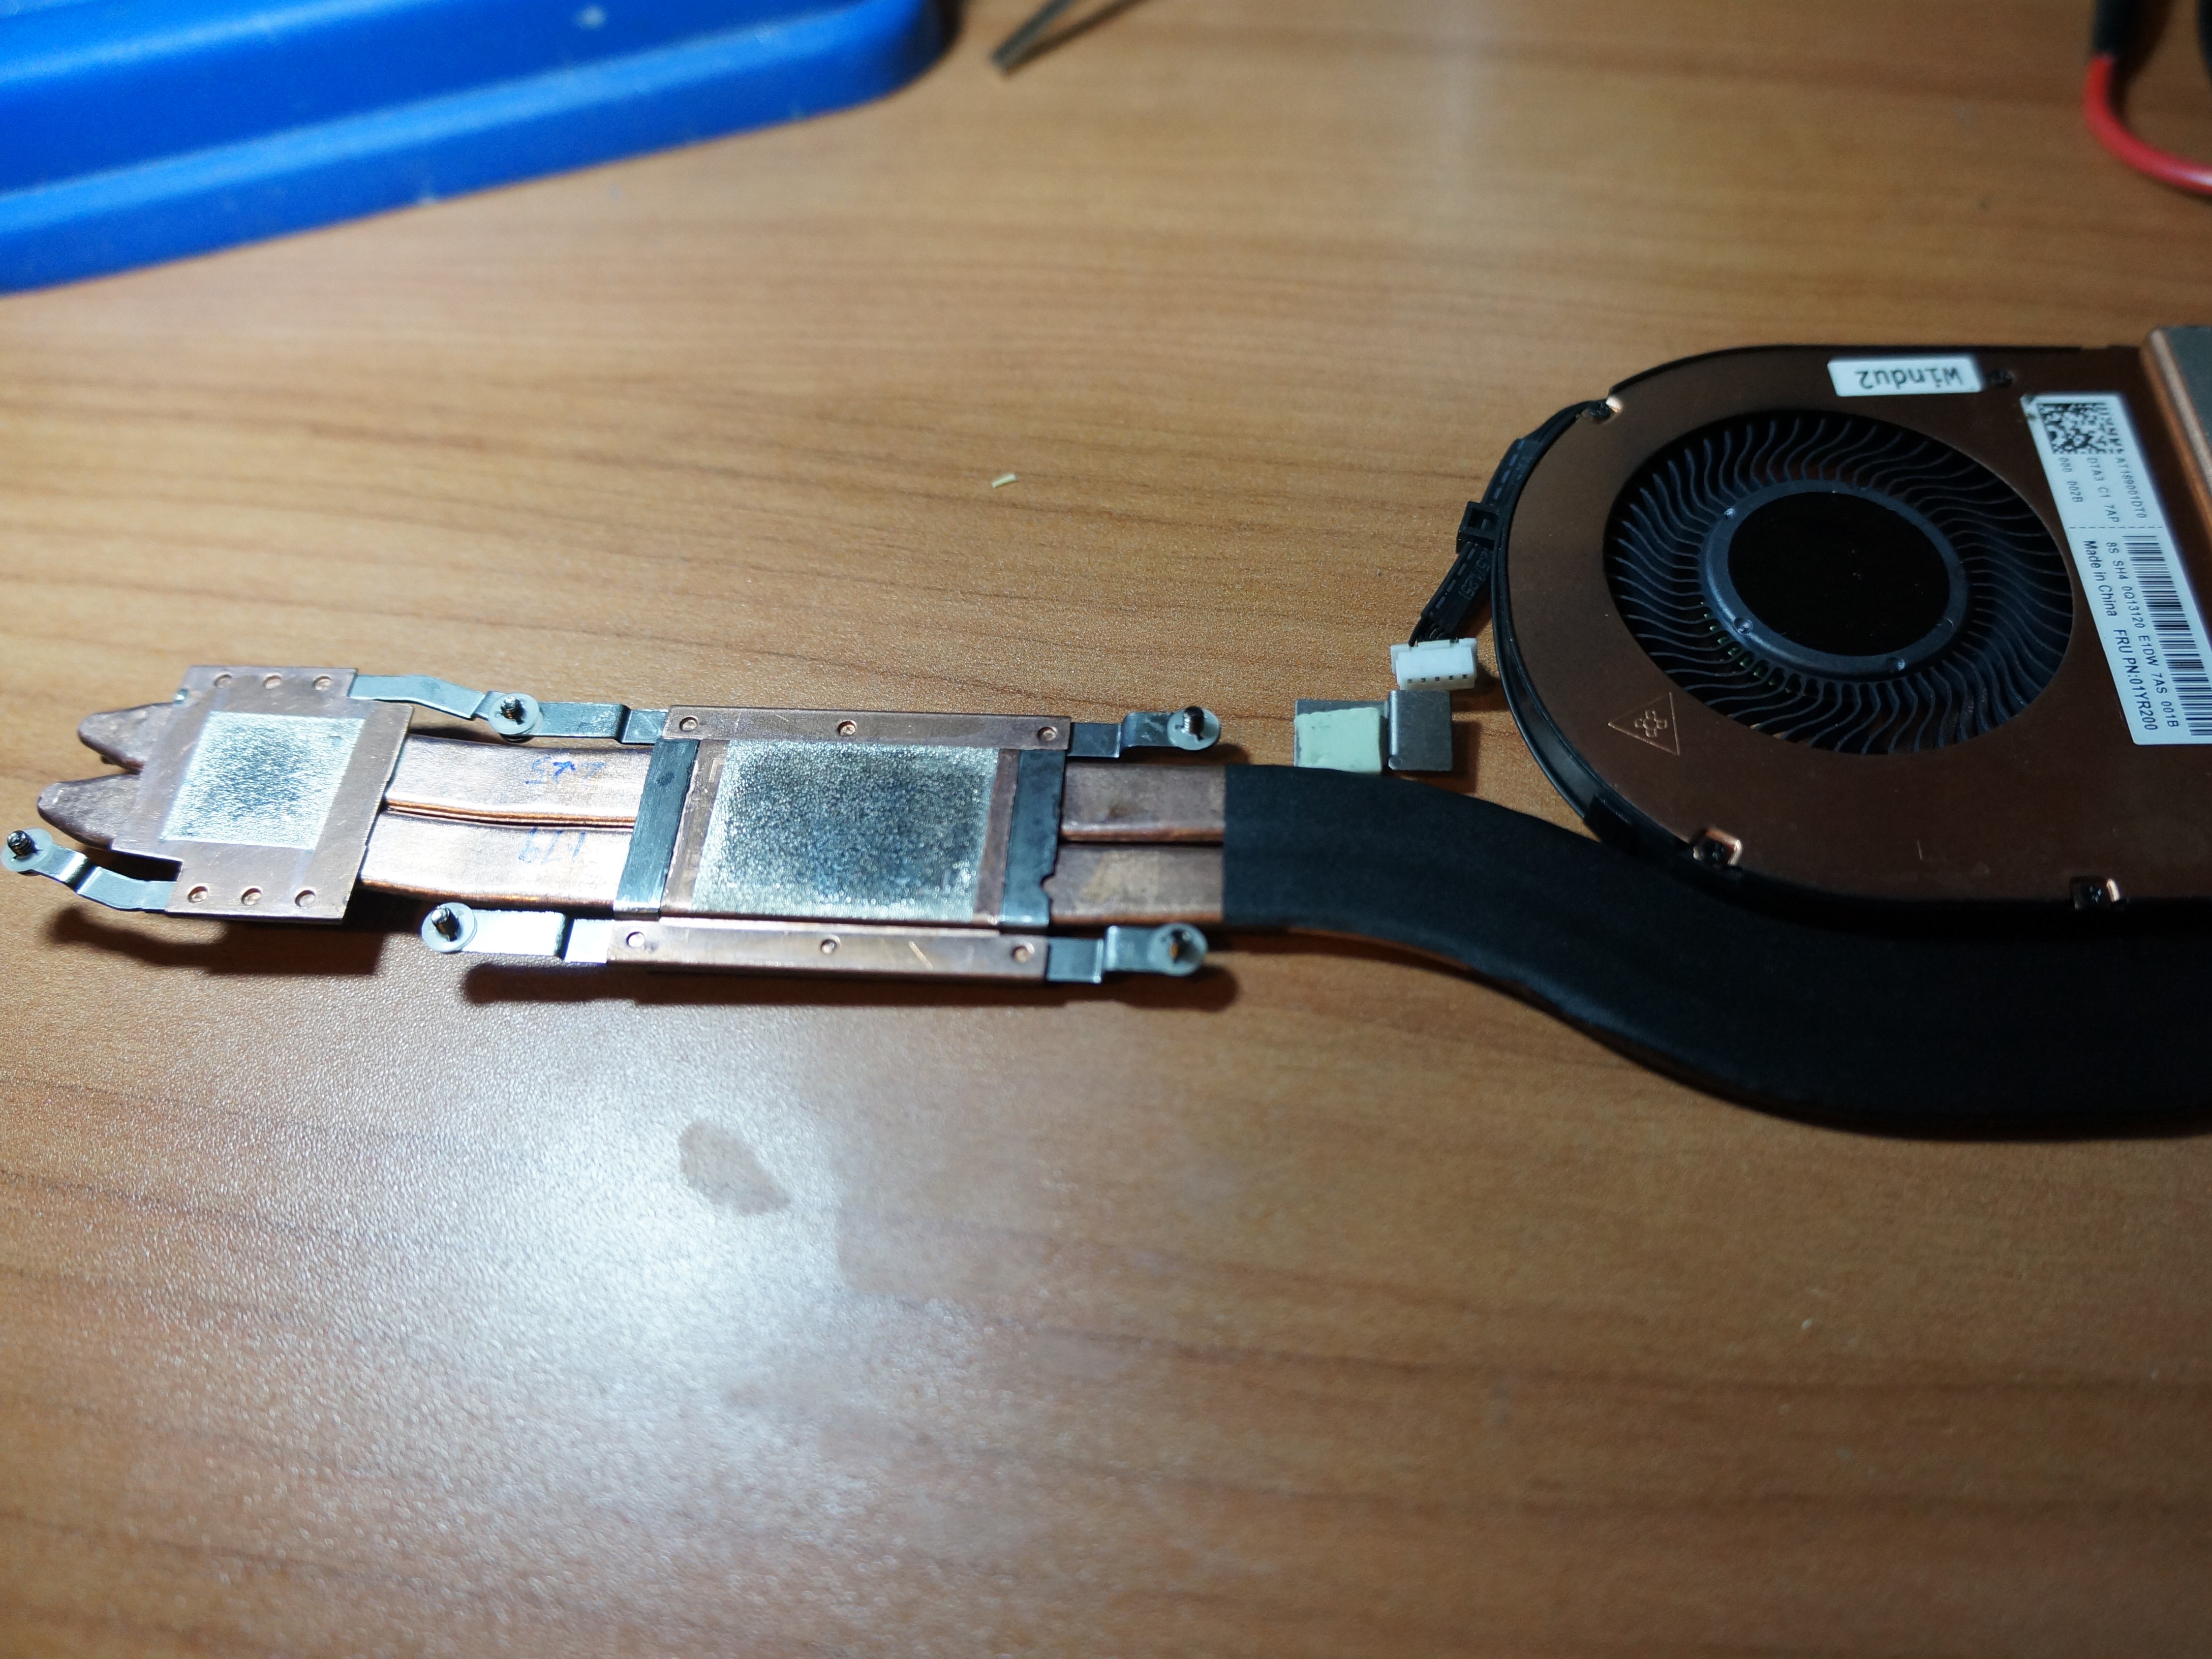
Electroplating took about a hour. After this I washed and dried the heatsink (photo 1) and insulated it at the places where it was insulated before (photo 2).
Protecting the System Board
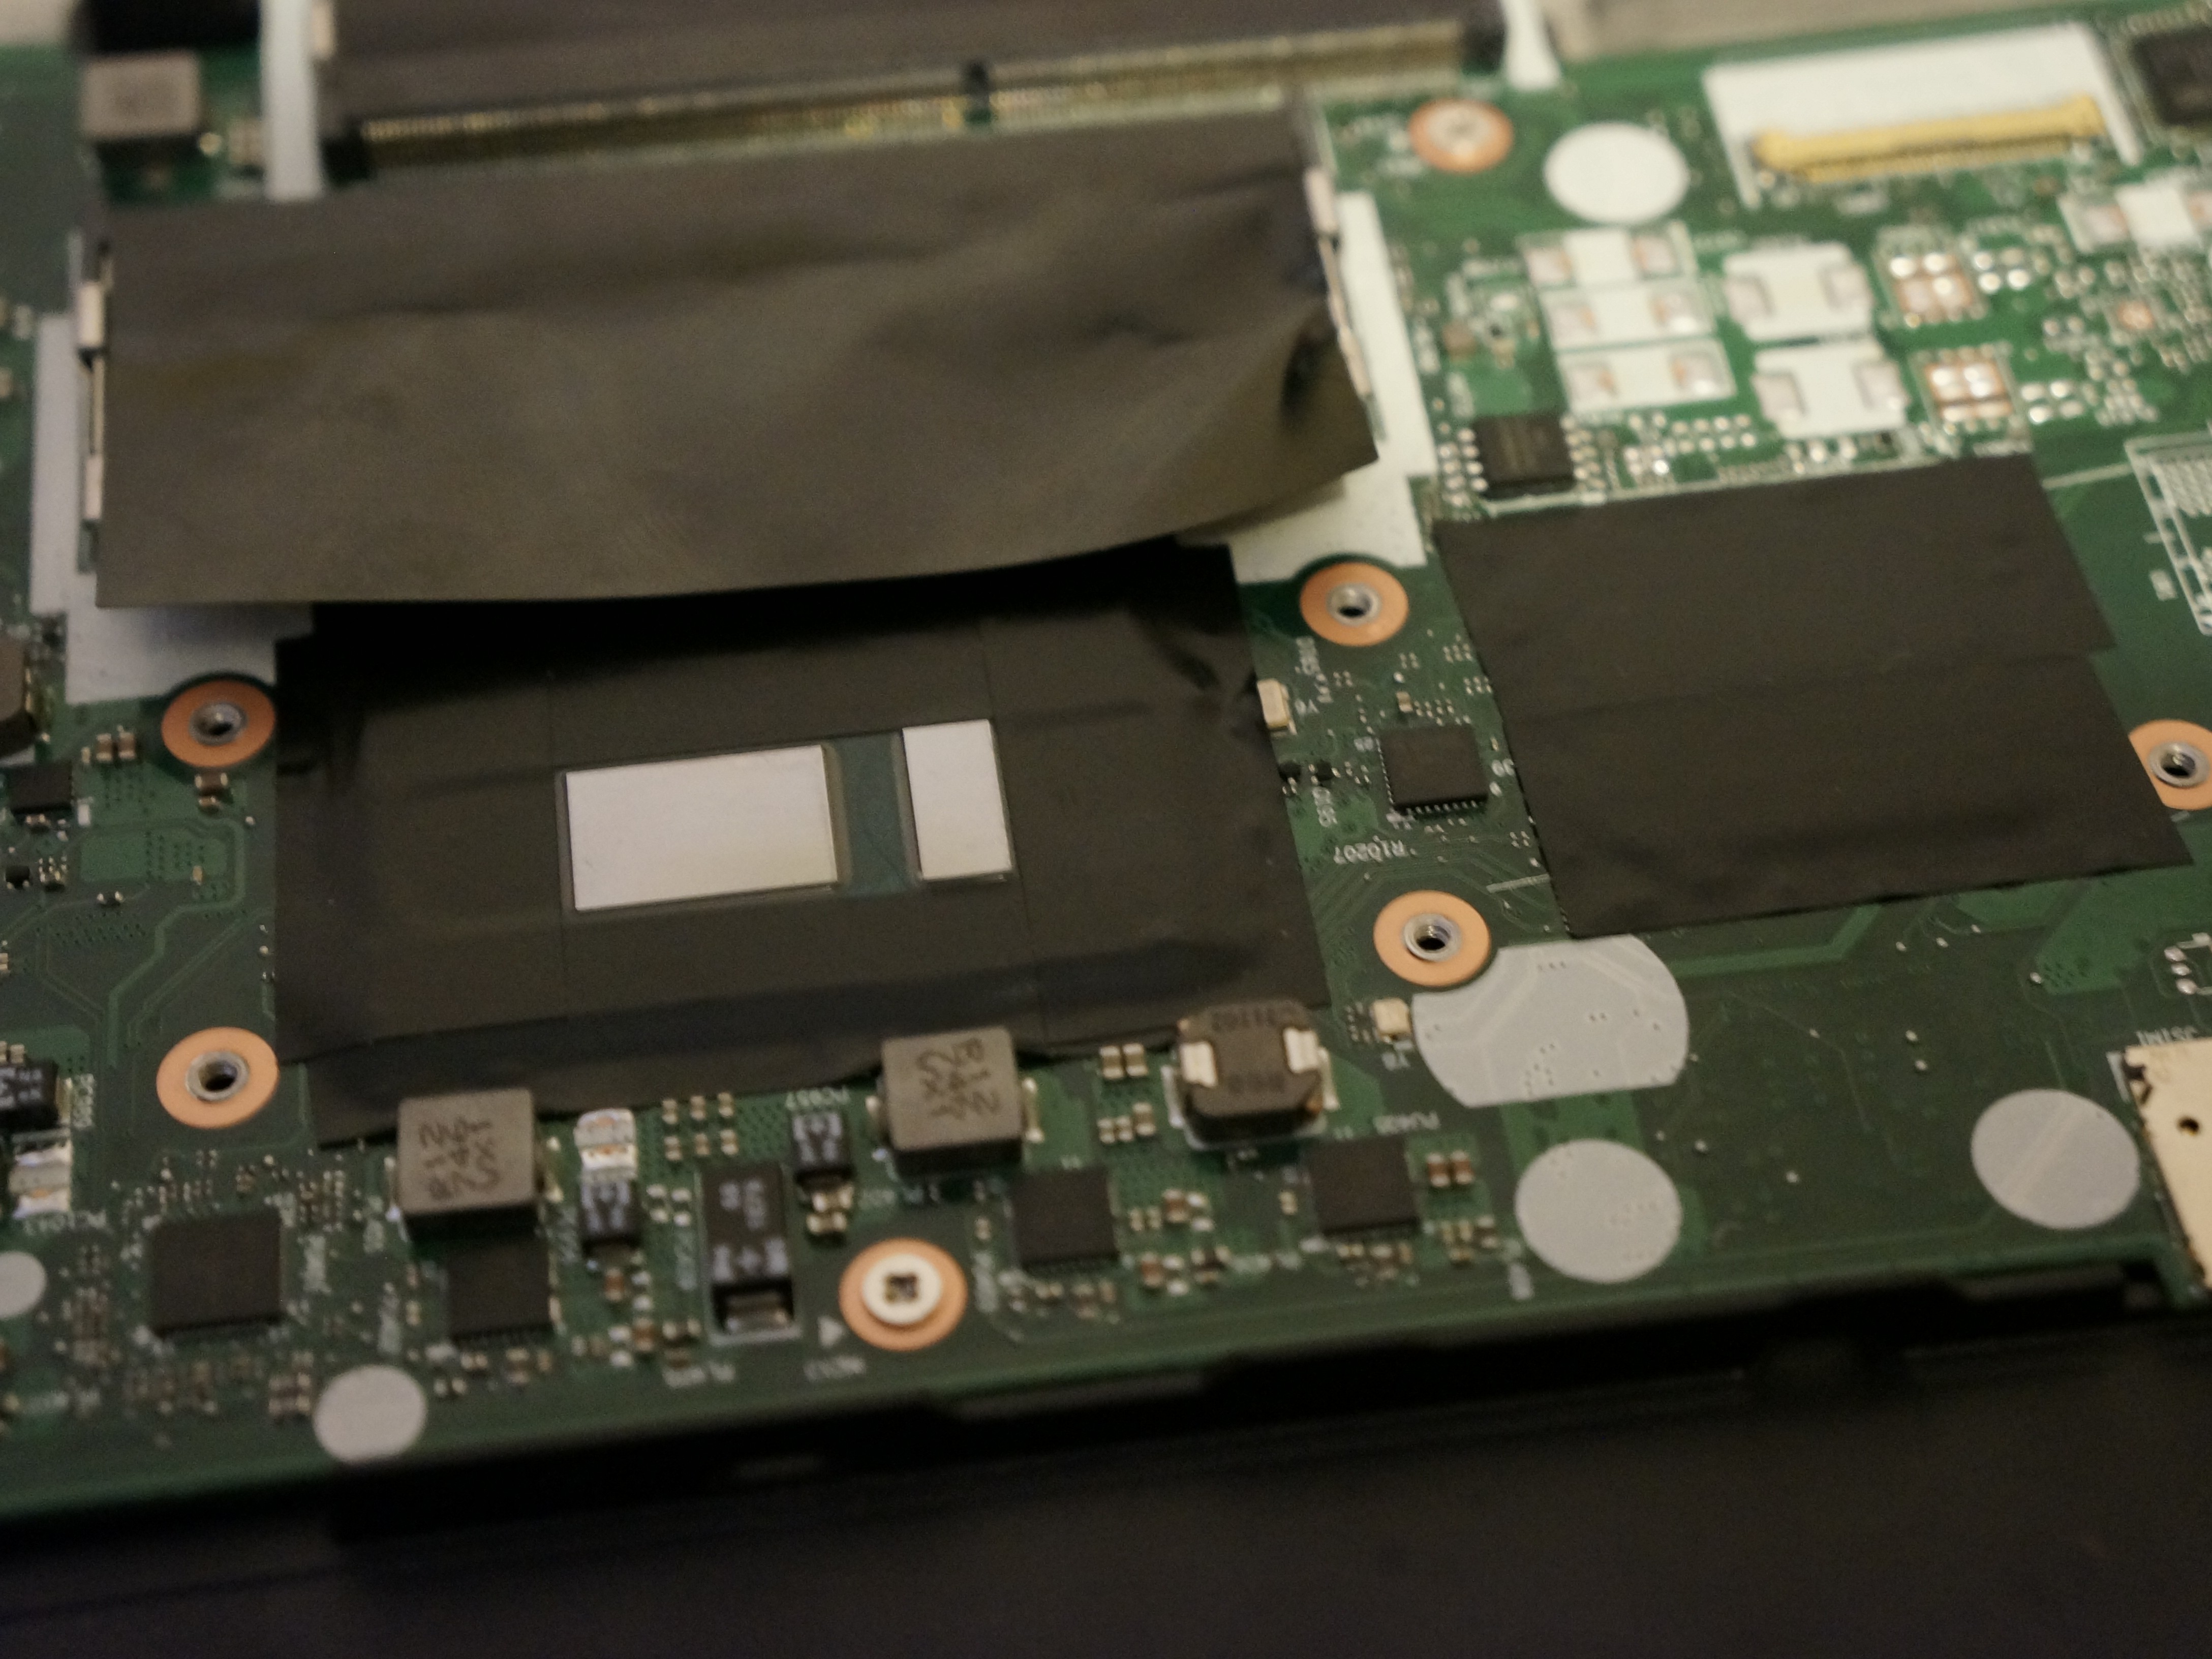
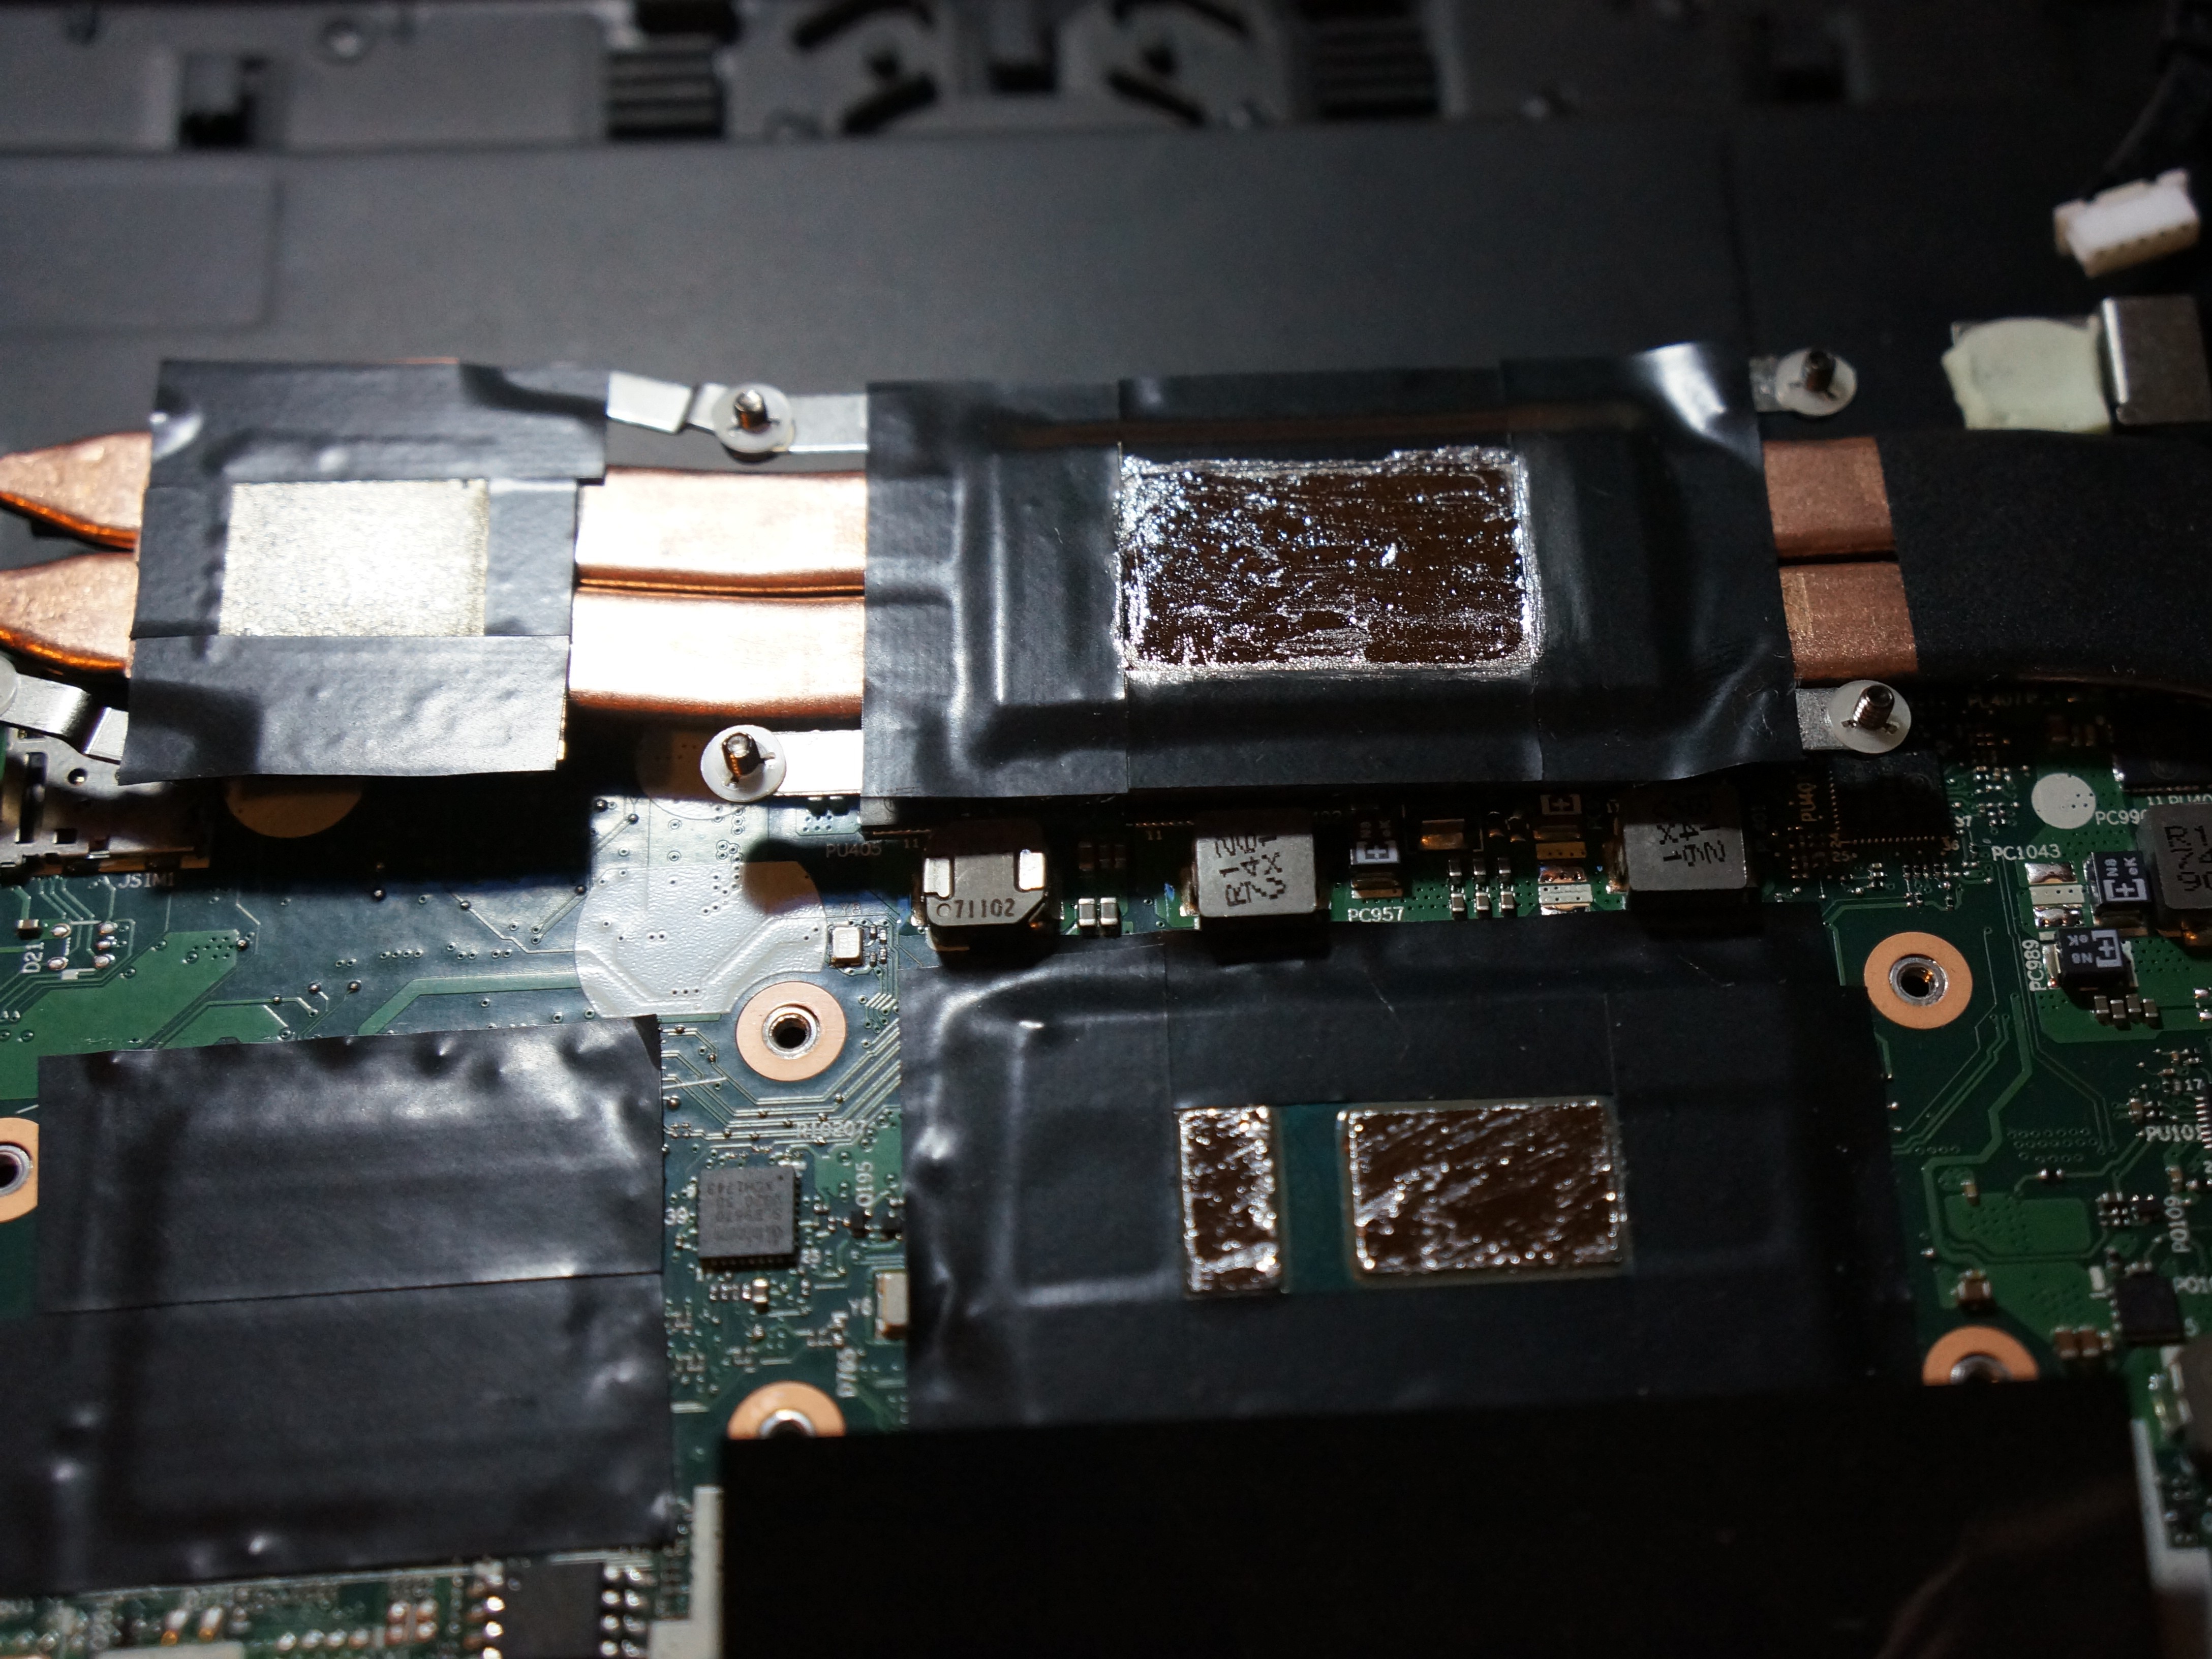
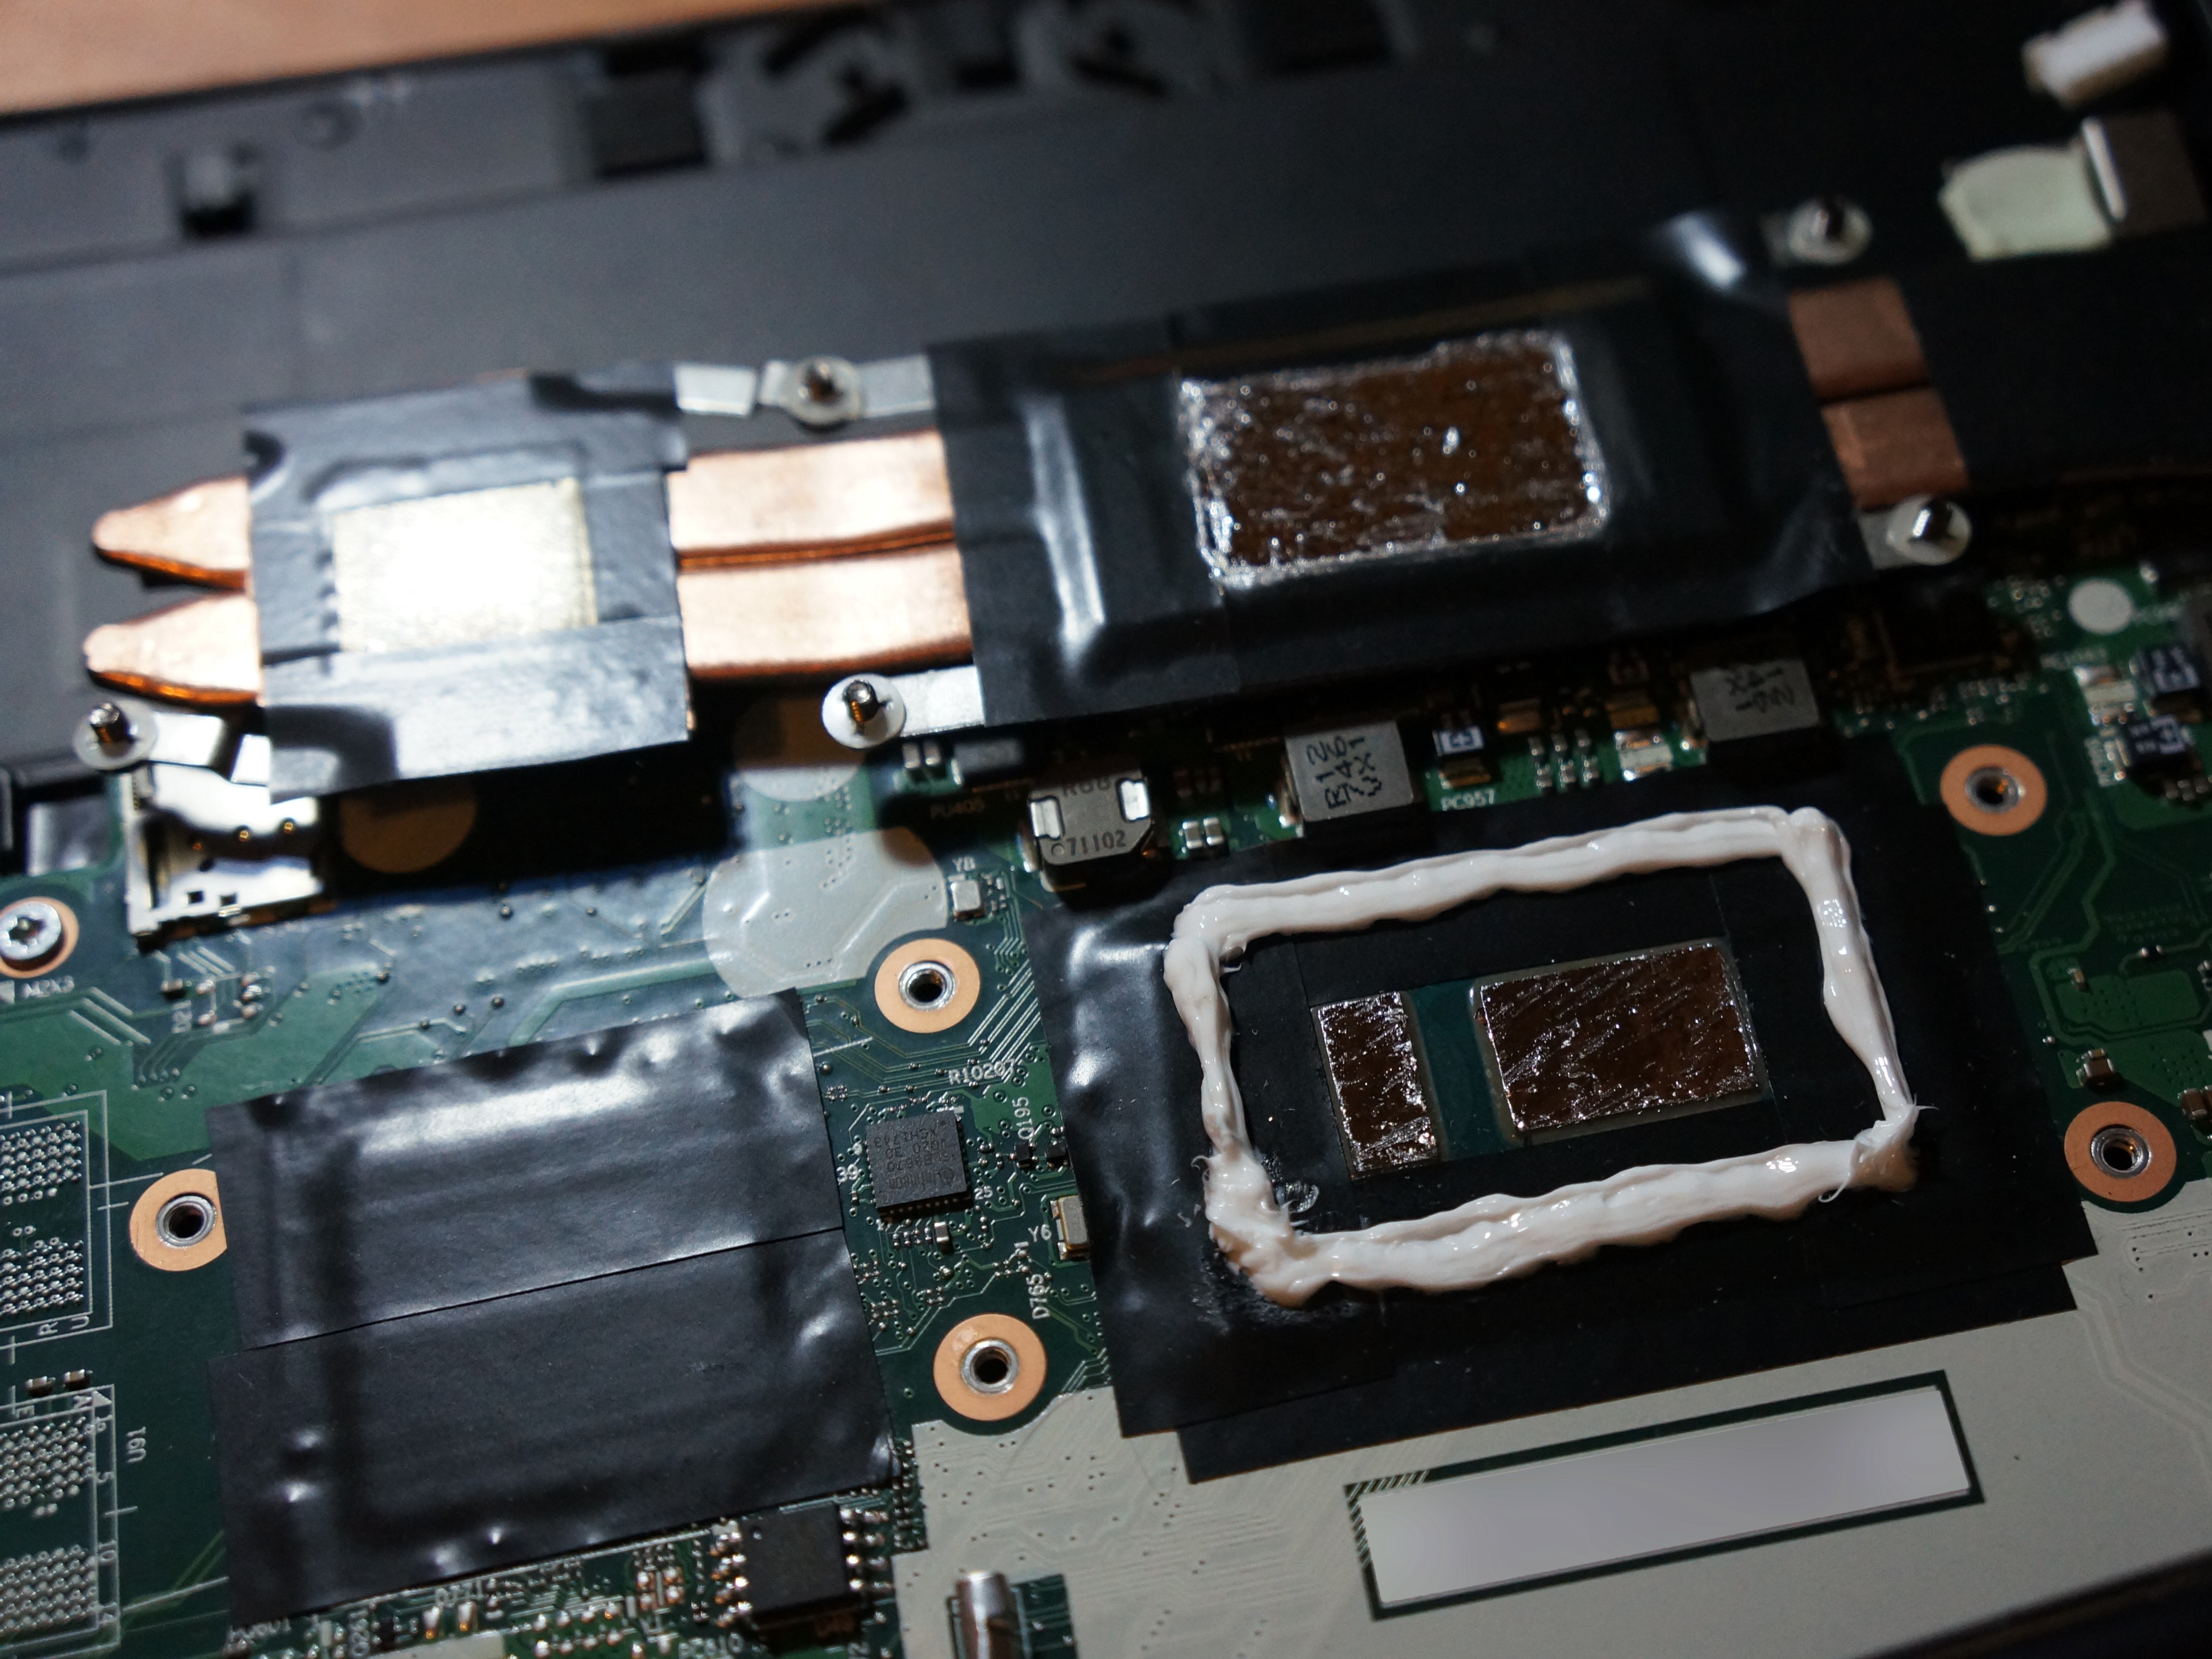
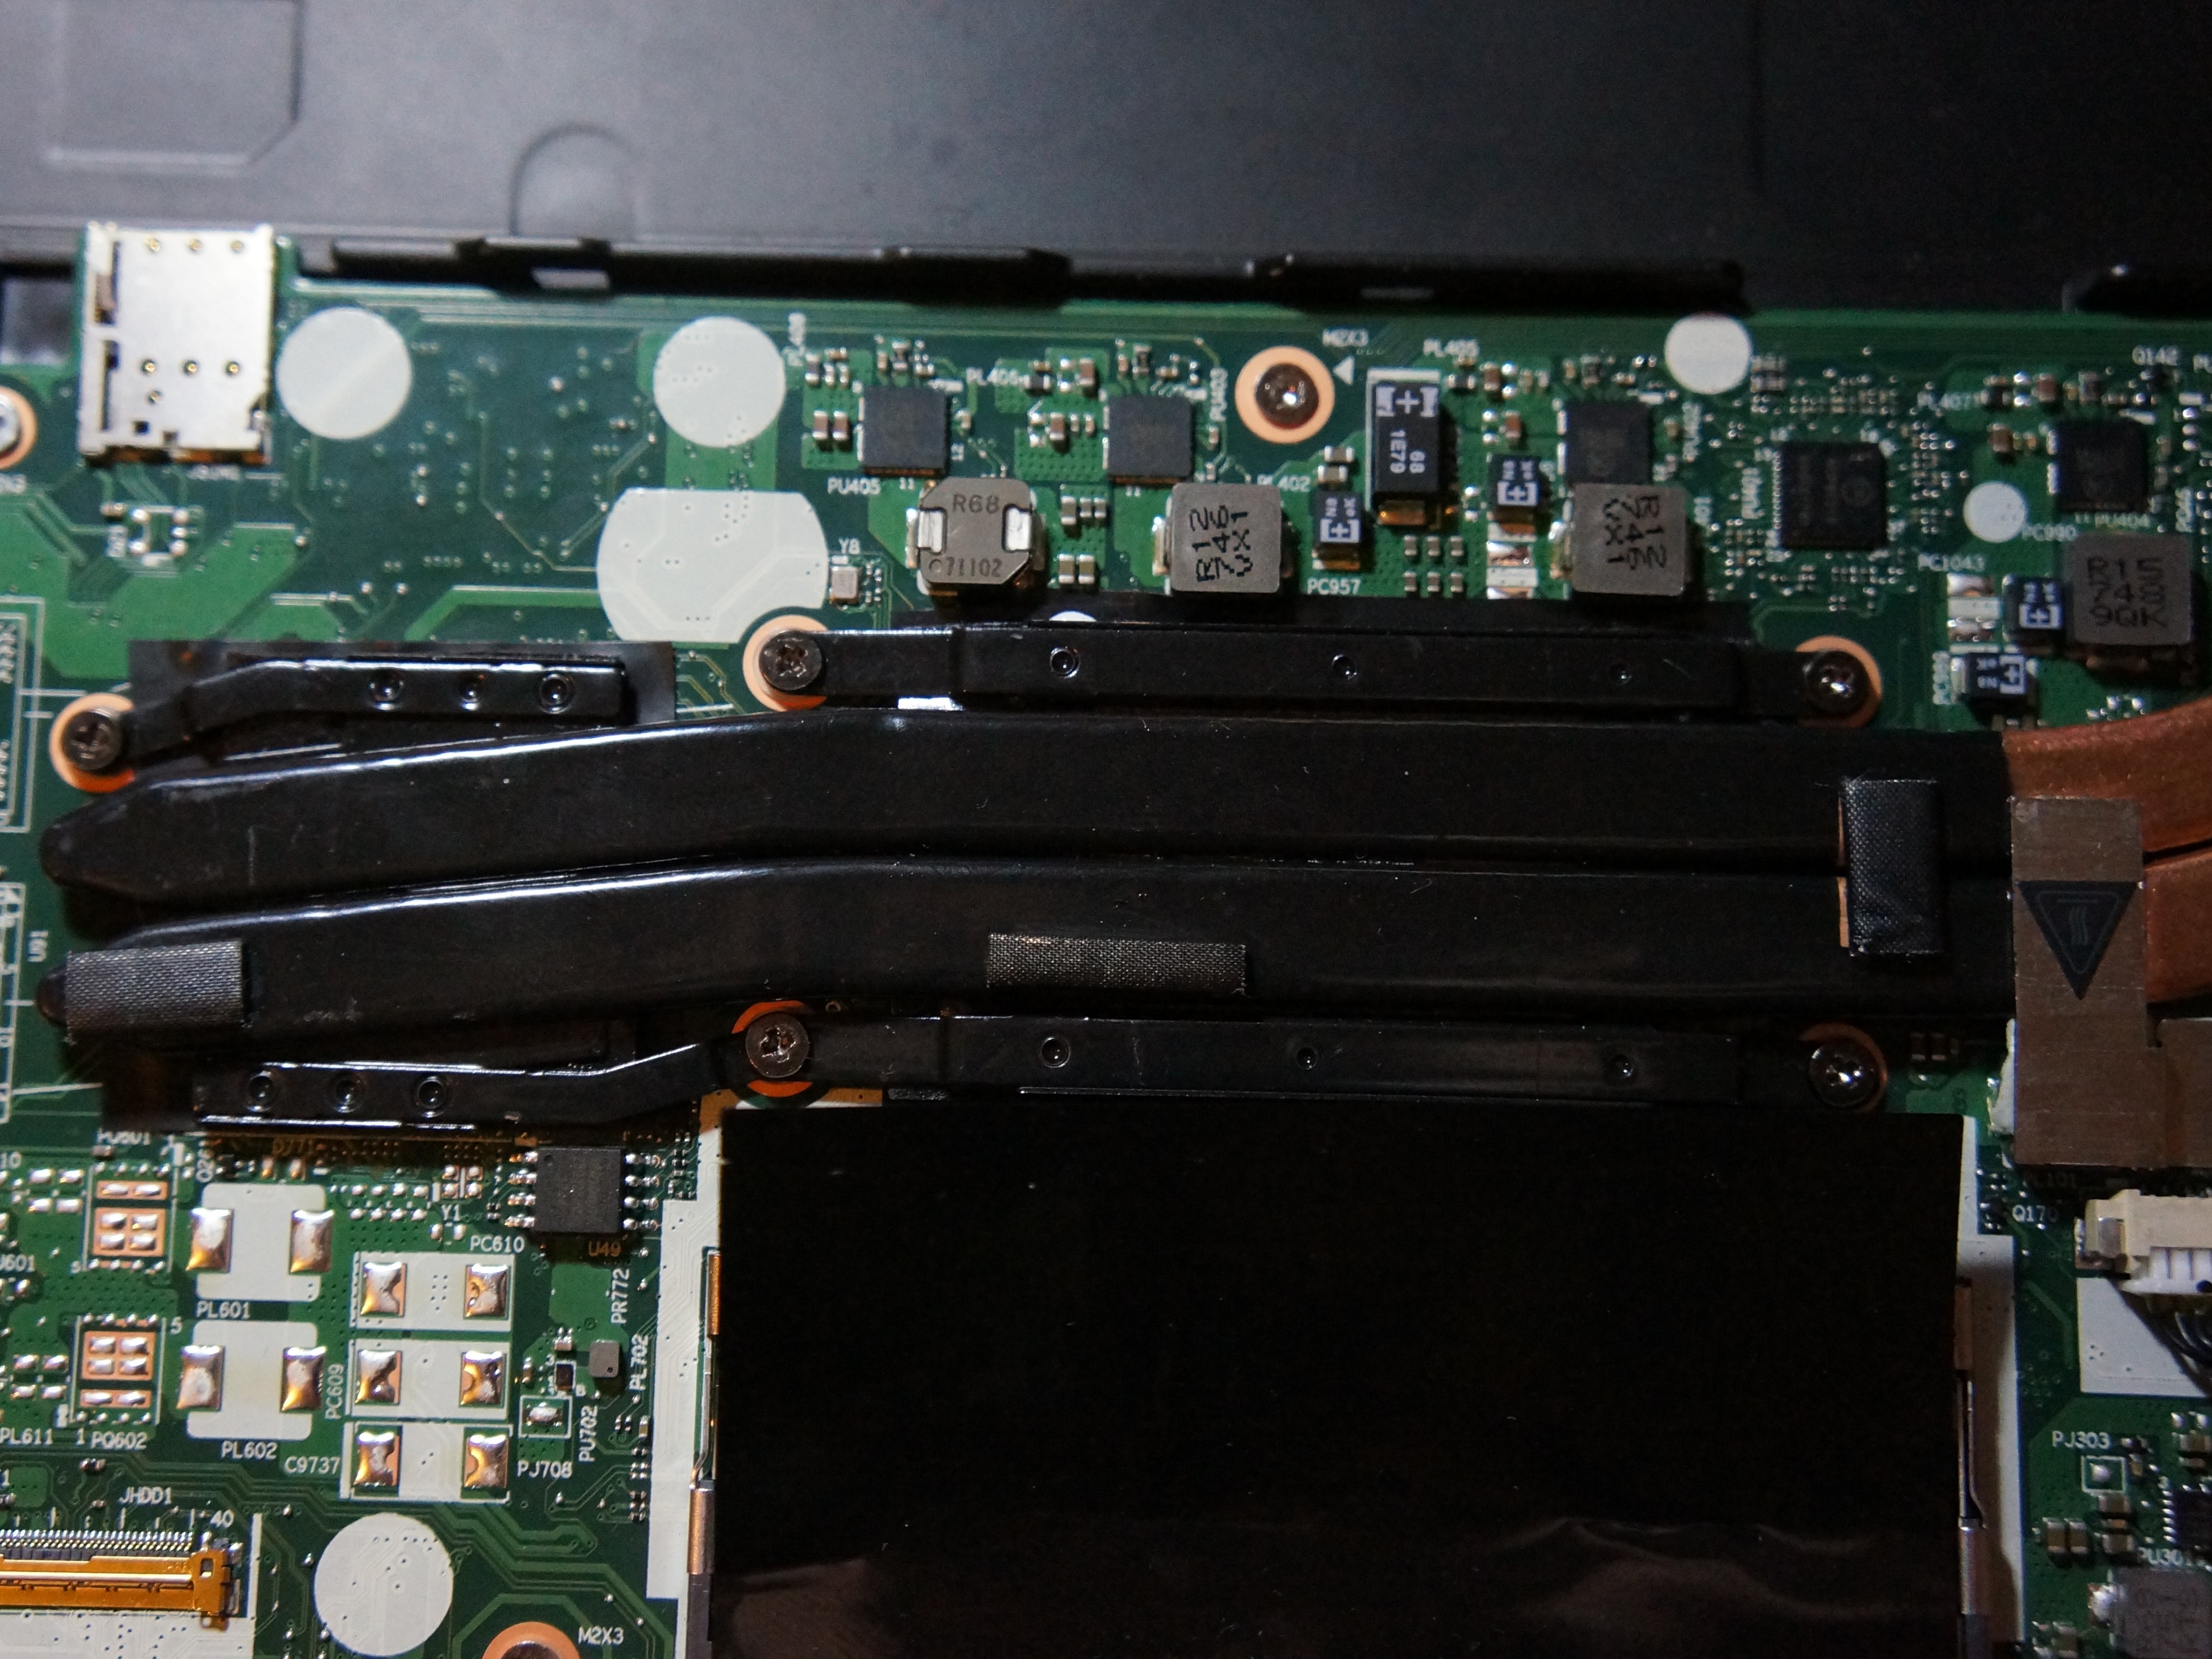
Liquid metals are dangerous since they also conduct electricity, which means they can short circuitry at the system board. In order to avoid the leakage, I insulated the CPU package (I also insulated the contacts for discrete GPU which I don’t have, while my heatsink is designed for system boards with discrete GPU) (photo 1). Then I applied a small drop of liquid metal and evenly spreaded it at both dies and the heatsink itself (photo 2). I also applied a sealant around the package in order to eliminate the possibility of leakage (photo 3) and then I installed the heatsink into the notebook (photo 4). Everything is ready!
Adjusting the CPU
In order to get the best performance, I need to undervolt the CPU and adjust the throttling limits. I used the tool called intel-undervolt which is designed for GNU/Linux systems, however it’s possible to do the same on Windows using Intel XTU and ThrottleStop utilities.
Undervolting the CPU
There are multiple voltage domains you’re able to adjust on 8th gen Intel ULV CPU, such as CPU, GPU, CPU cache, uncore (system agent), and analog I/O. I applied the values reducing the voltage by 5 mV and then ran tests. I used the following tools to test the stability of the system:
mprime— Allows to stress test the CPU. It will also report about calculation error which signify about too low voltage.stress-ng— Allows to stress test the CPU as well. It’s useful when you will undervolt CPU cache and uncore.glmark2— GPU benchmark. It’s useful for GPU undervolting. Artifacts will also signify about too low voltage.
I also noticed that adjusting GPU voltage doesn’t take effect. The value applied to uncore is also applied to GPU instead.
After about a hour of tests and amends, I decided to set the following values:
undervolt 0 'CPU' -90
undervolt 1 'GPU' -90
undervolt 2 'CPU Cache' -100
undervolt 3 'System Agent' -90
undervolt 4 'Analog I/O' -100
Increasing the Limits
There are 3 throttling limits available for Intel CPUs: temperature limit, power limit, and current
limit. Current limit is pretty useless since P = UI! intel-undervolt supports only temperature and
power limits. Temperature limit is applied to all cores, while power limit has its own domains.
Right now intel-undervolt supports only package power domain.
I increased the temperature limit to 97°C (which is more or less safe for ULV CPUs as far as I know) and set the power limit to 45 W. Setting this high power limit eliminates the power limit at all: ULV CPU won’t be able to consume this much power, so I’m leaving the temperature limit only in this case. Increasing the power limit is a hack which makes CPU designed for ultrabooks work like HQ CPUs of previous gens (and even better).
I wrote these values to intel-undervolt configuration file:
power package 45/0.002 45/28
tjoffset -3
Setting offset to -3 means that temperature limit will be set to 100 - 3 = 97, where 100 is a critical temperature for the CPU.
Additional Tweaks
In order to get 4.2 GHz from i7-8650U in single-core I need to set HWP to performance in tlp
(this utility is designed to adjust power settings on GNU/Linux systems).
CPU_HWP_ON_AC=performance
CPU_HWP_ON_BAT=balance_power
I also noticed that fan is able to rotate at higher speeds than EC (embedded controller) allows. In
order to increase the fan speed, I used thinkfan (ThinkPad-only) utility and set the maximum fan
level at temperatures higher than 85°C (so-called level disengaged).
Benchmarks
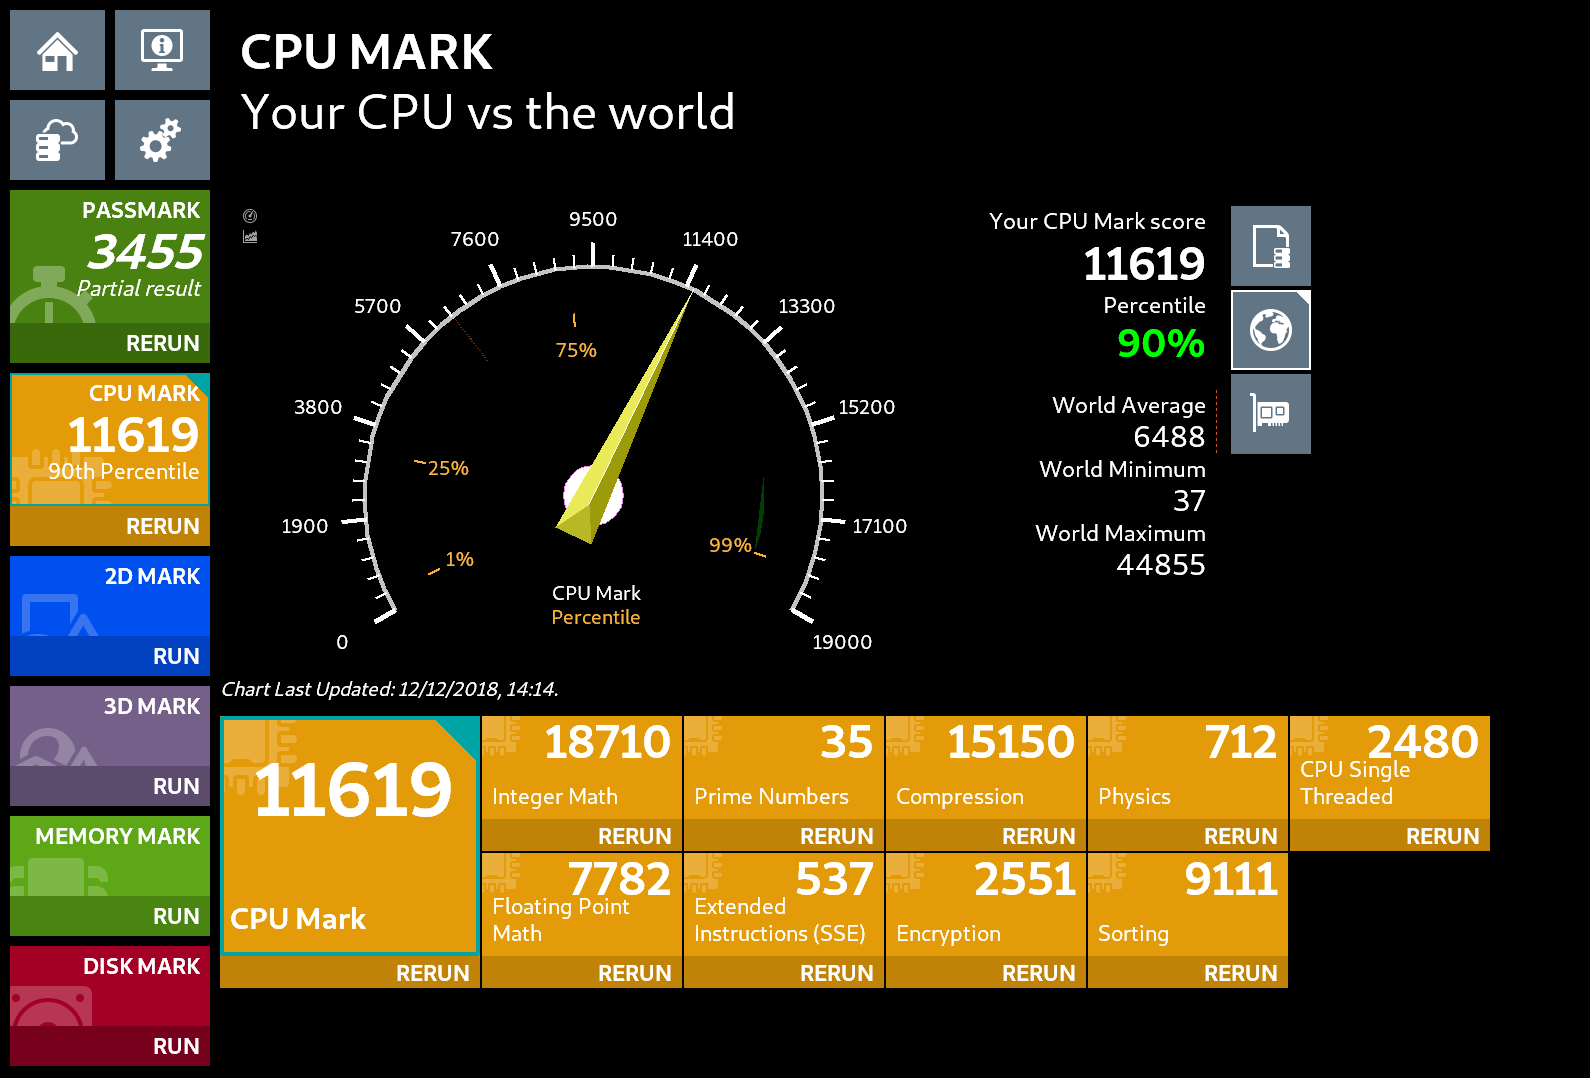
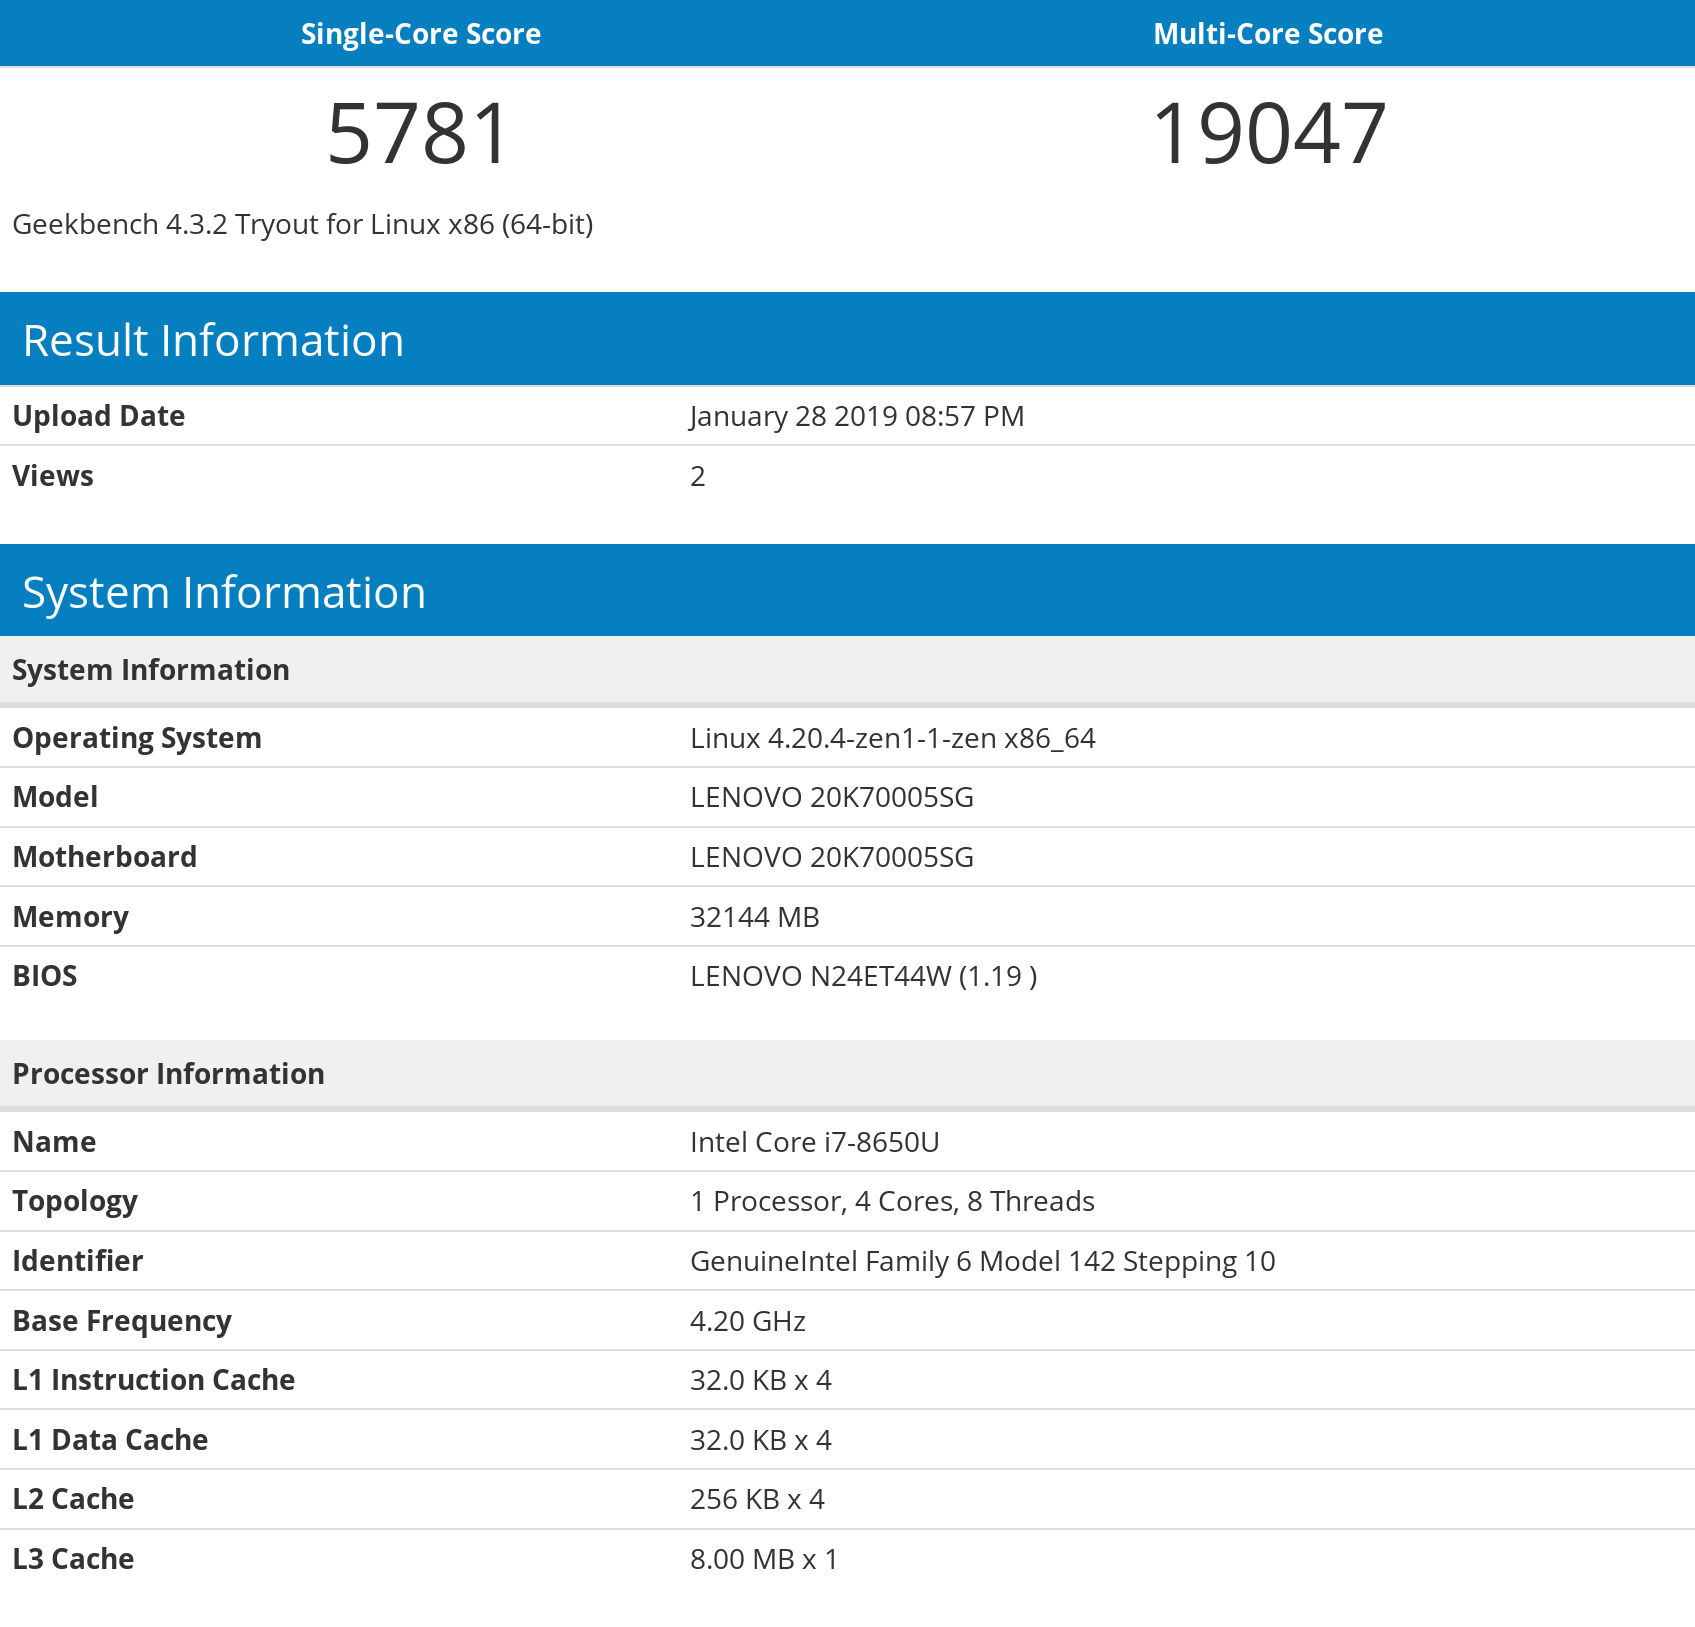
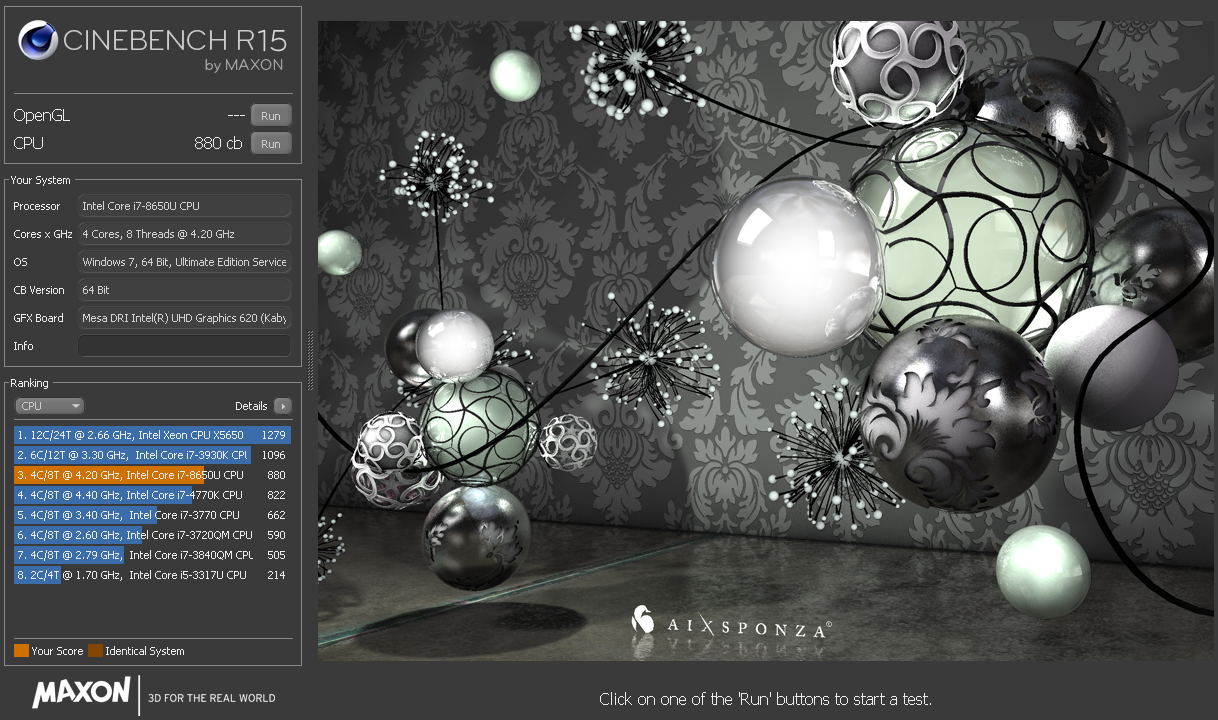
I tried to run several benchmarks and got surprising results. I hit 11619 in PassMark Performance Test 9 (screenshot 1) while the average result for i7-8650U is 8834. I also got 5781 single-core score and 19047 multi-core score in Geekbench 4 (screenshot 2). At the first Cinebench R15 run I hit 880 (screenshot 3)!
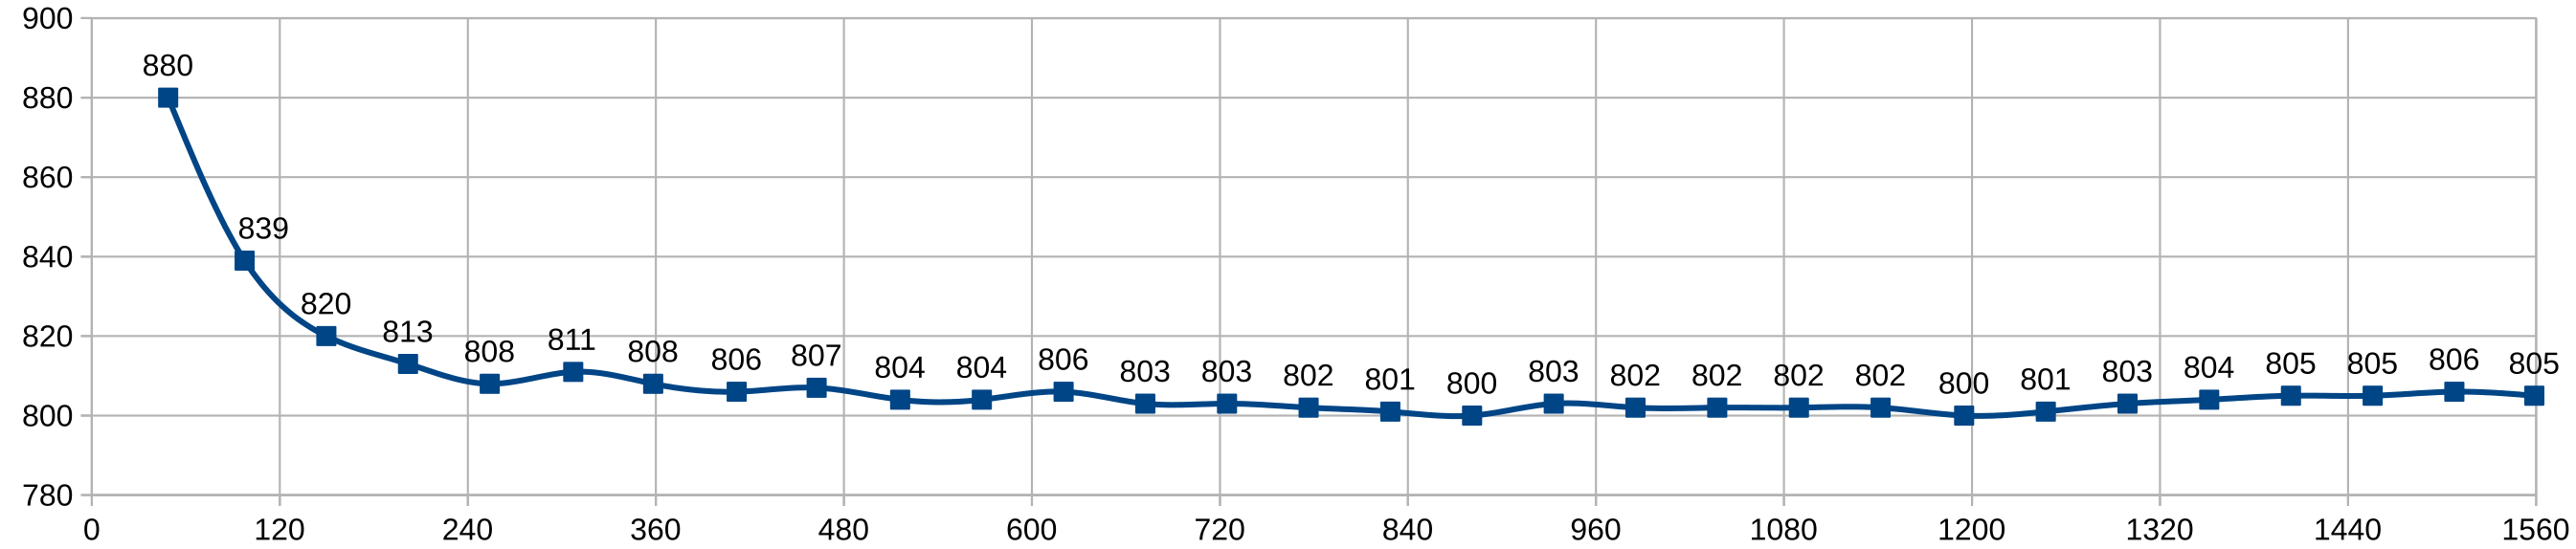
I tried to run Cinebench 30 times in a row and look at how the result will change after multiple runs. The plots of result, frequency, power, and temperature versus time are presented below. After multiple runs the result is dropped to 805 due to thermal throttling, which is expected since power limit doesn’t take effect anymore.

Stress Test
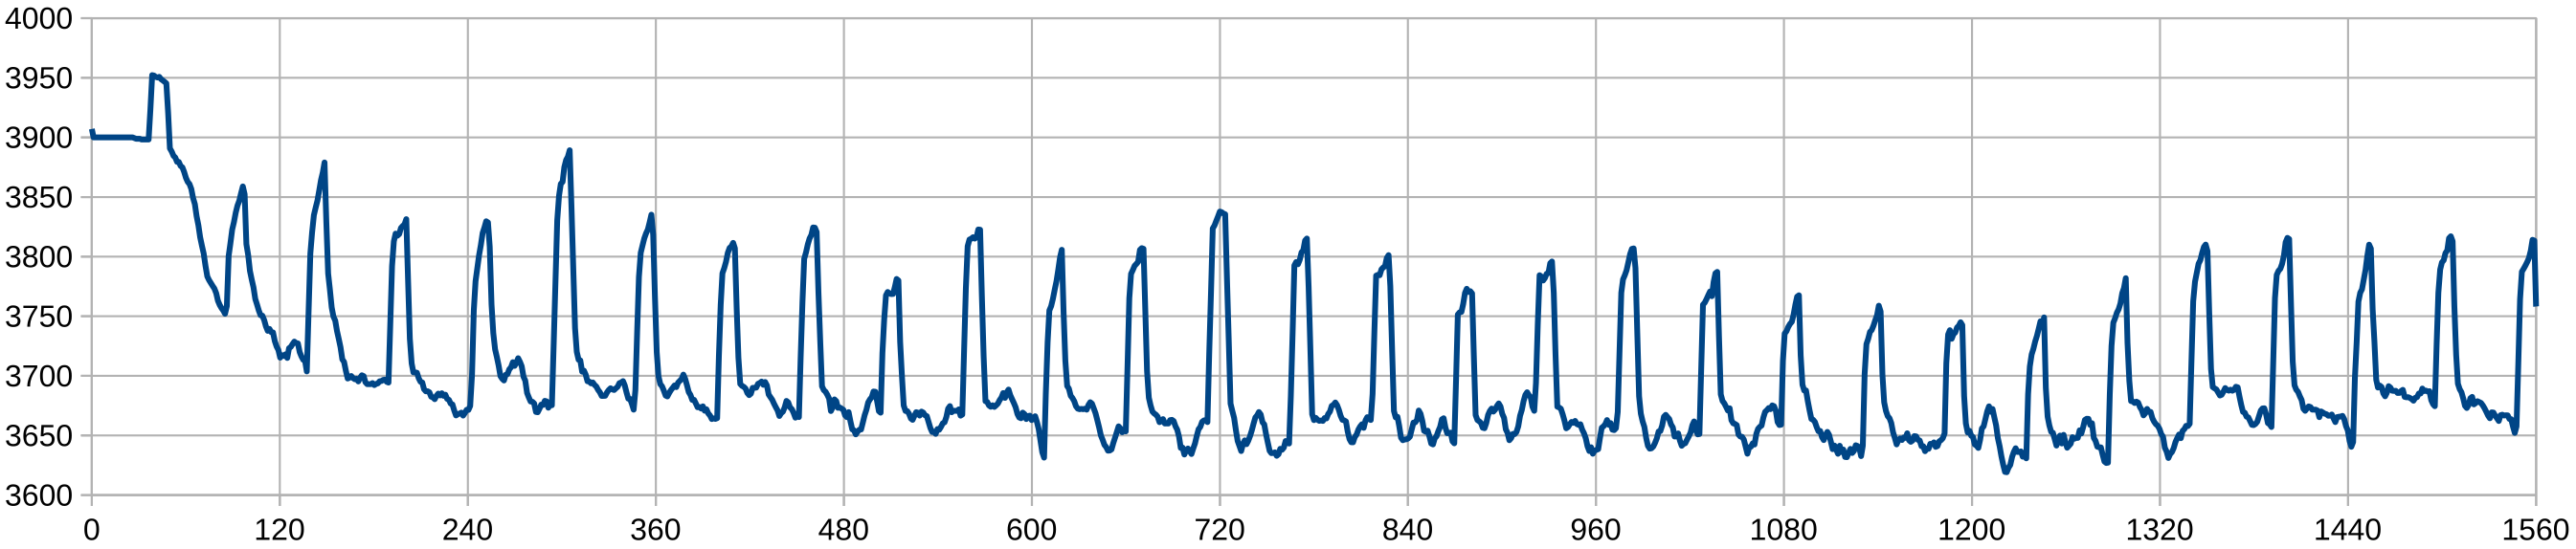
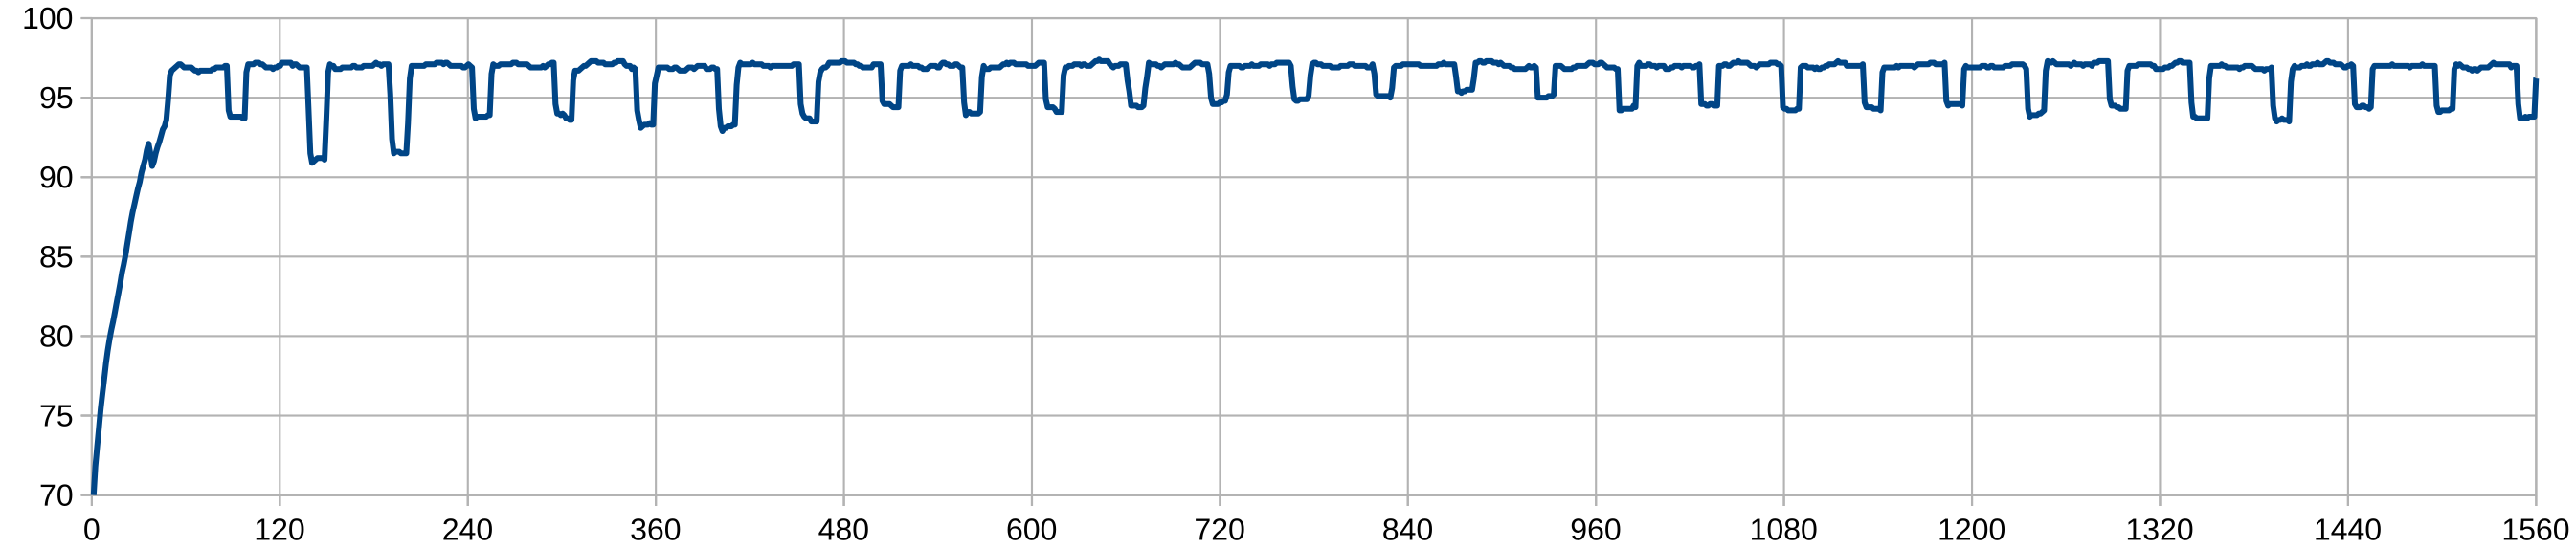
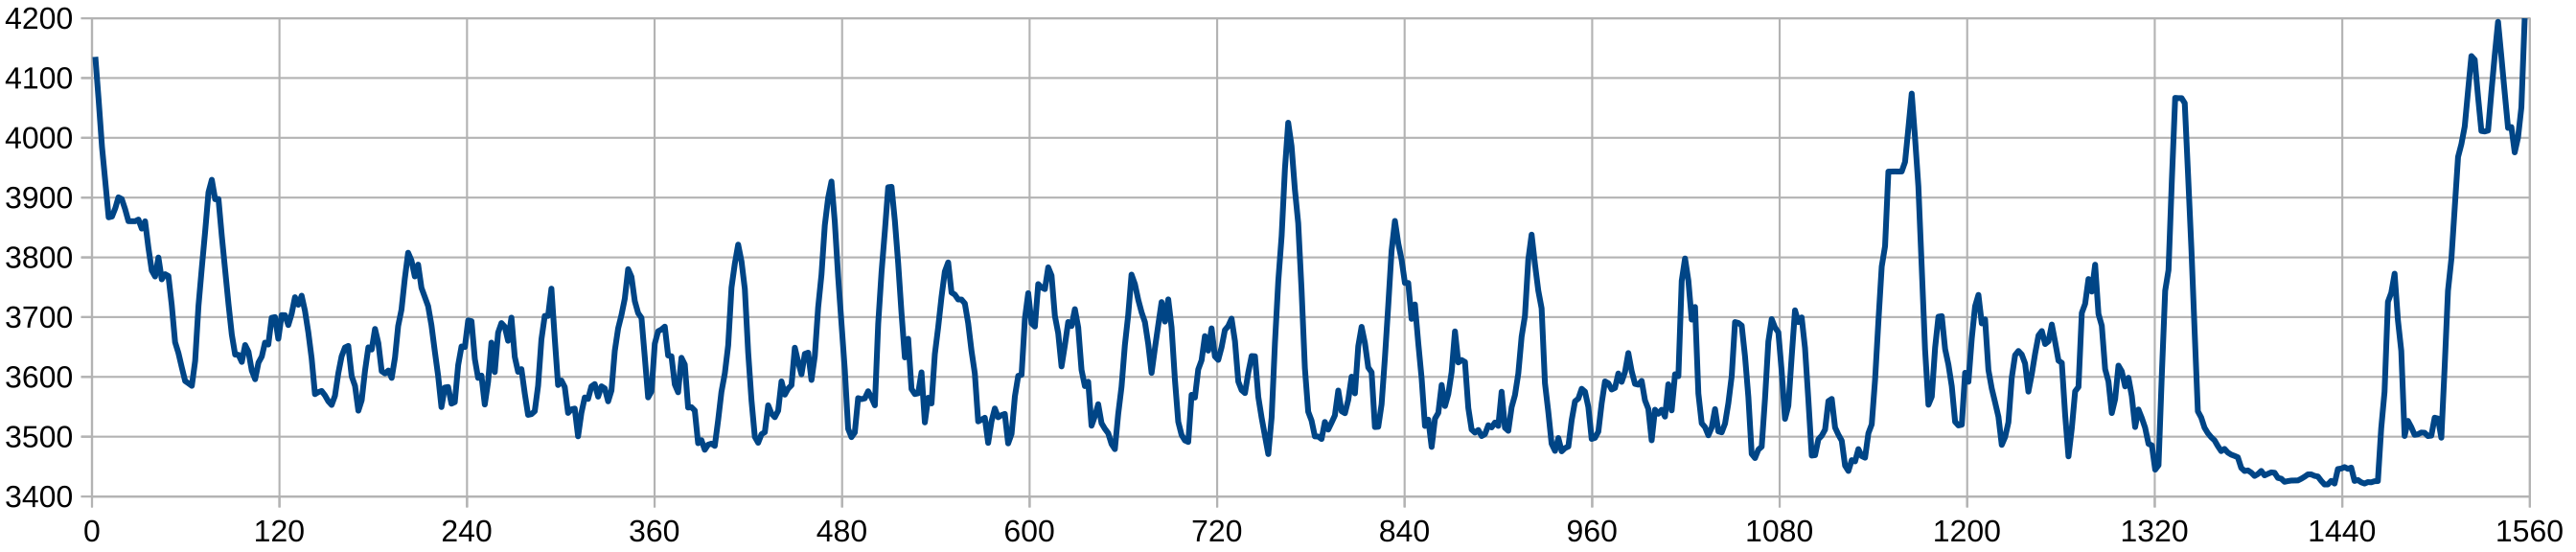
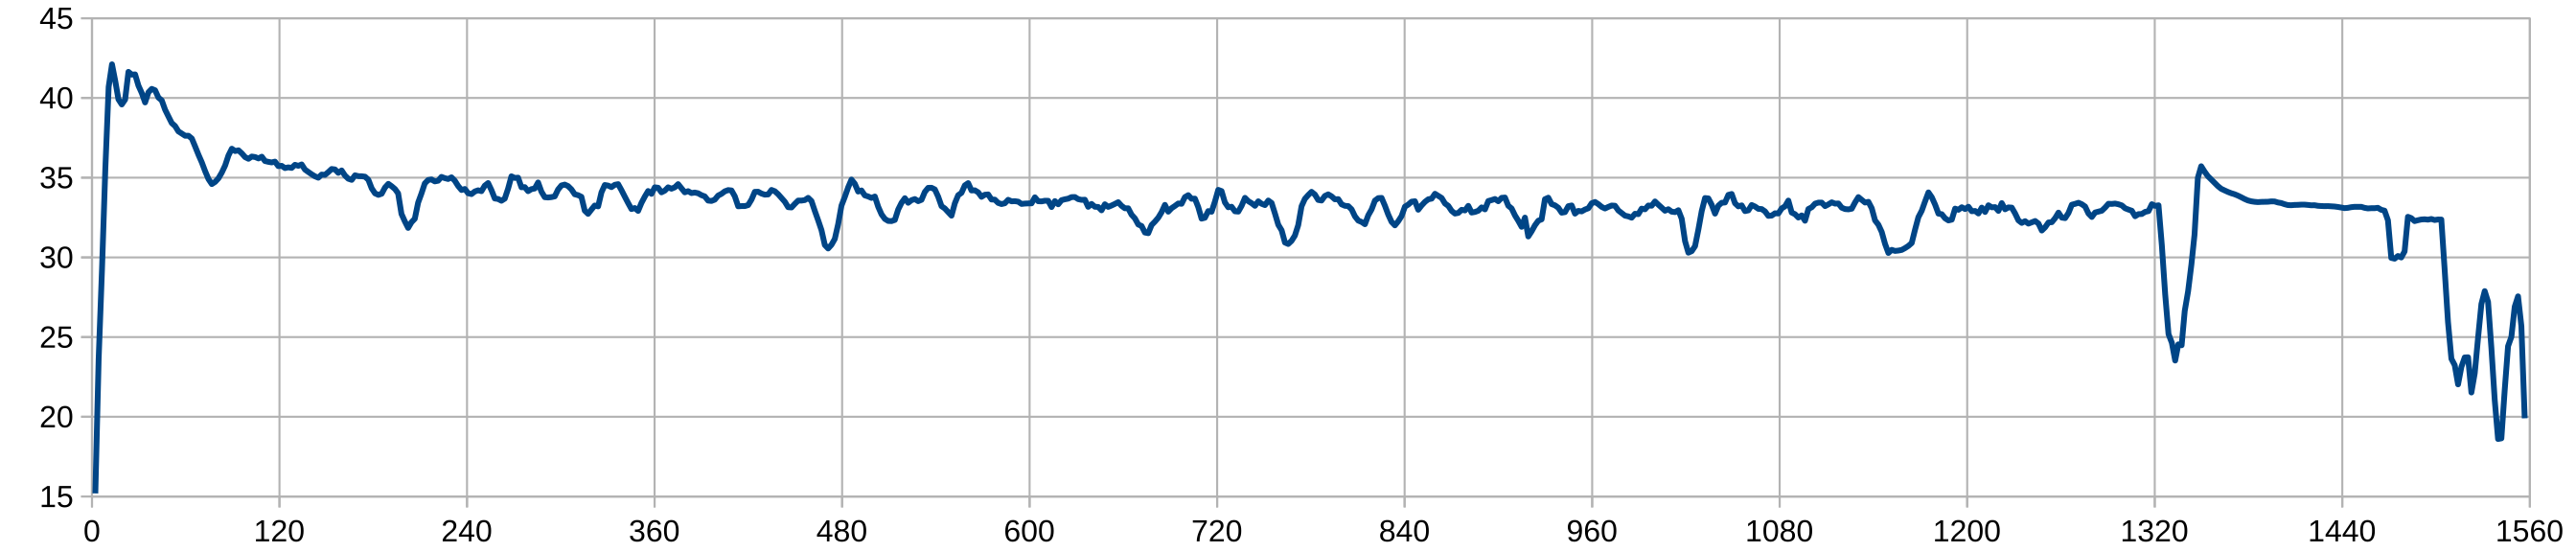
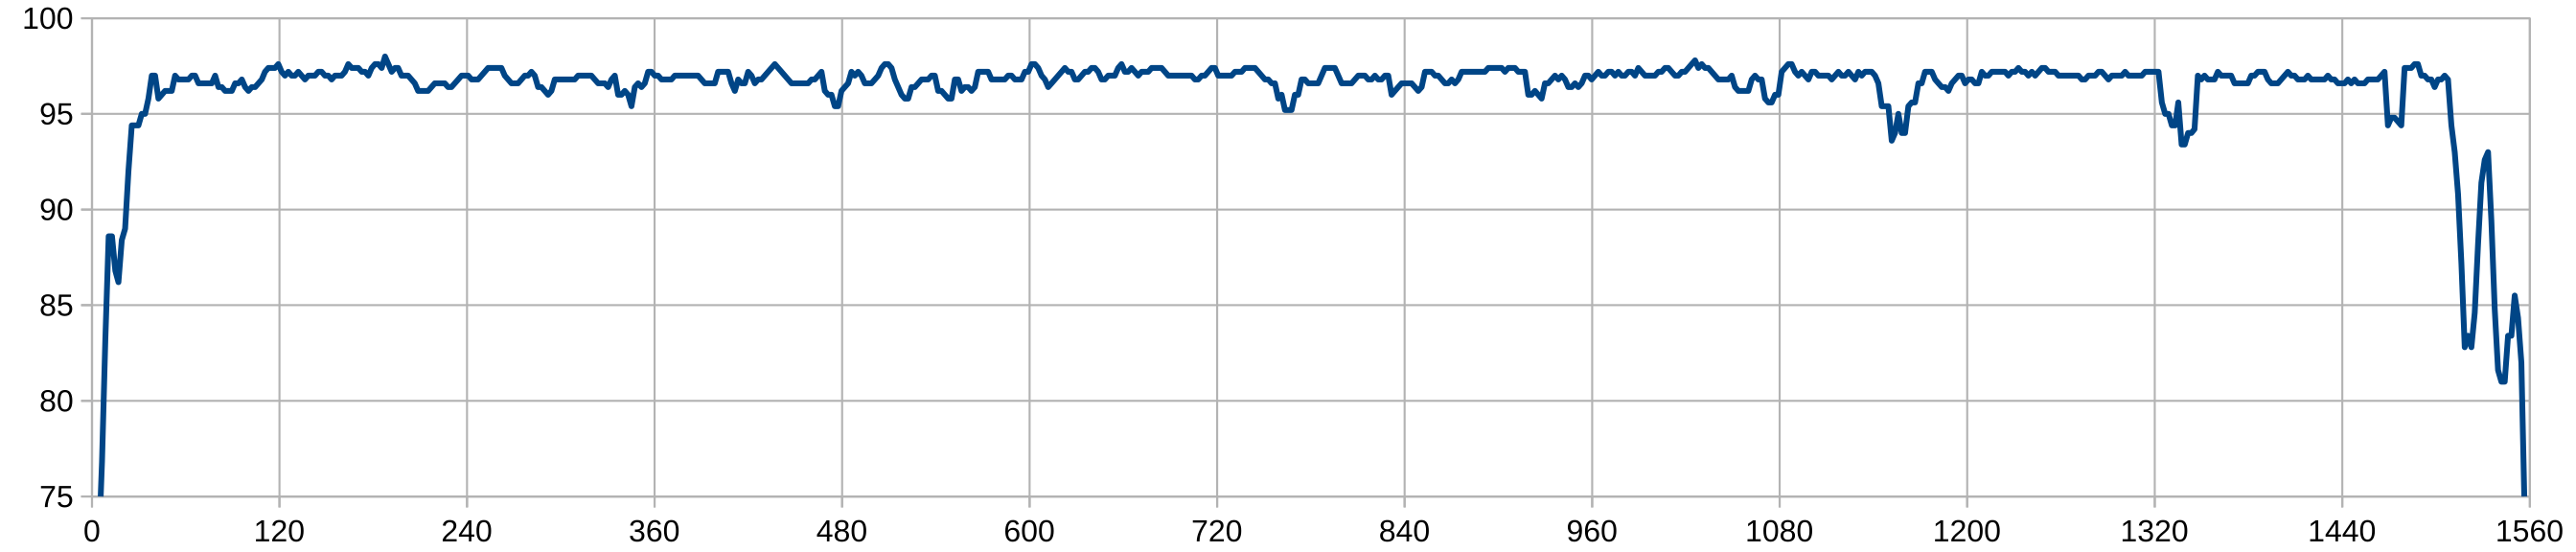
I ran stress test (stress-ng -c 8) and measured the CPU frequency, power consumption, and
temperatures during the test. The plots of frequency, power, and temperature versus time are
presented below.
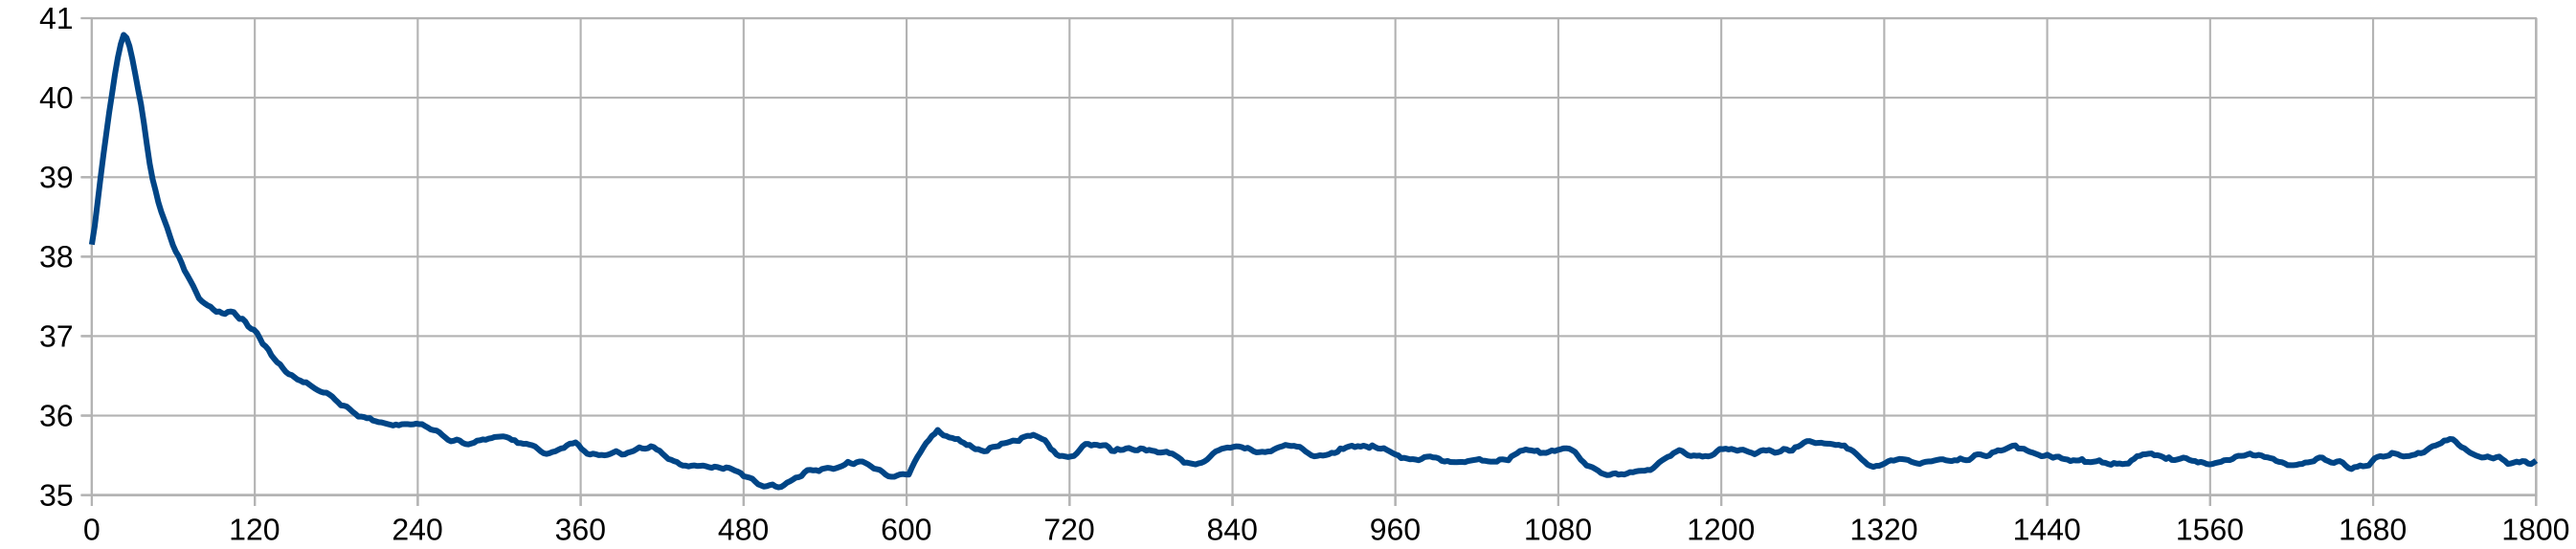

This test manifests that power consumption drops to 35-36 W while CPU frequency drops to 3.7-3.8 GHz under continuous full load.
Linux Compilation
I also tried to compile Linux kernel and measure the same values during compilation. I used
makepkg tool to build the kernel package, which is configured as follows:
CFLAGS="-march=native -O2 -pipe -fno-plt"
LDFLAGS="-Wl,-O1,--sort-common,--as-needed,-z,relro,-z,now"
MAKEFLAGS="-j8"
BUILDENV=(!distcc color !ccache check !sign)
OPTIONS=(strip docs !libtool !staticlibs emptydirs zipman purge !debug)
COMPRESSXZ=(xz -c -z --threads=0 -)
The following testing methology was used:
$ git clone https://git.archlinux.org/svntogit/packages.git -b packages/linux --single-branch
$ cd packages/repos/core-x86_64
$ git checkout 6561f31156a75eb3ba91620633a5c90c95a05ff2
$ makepkg -osr
$ rm -rf src
$ time makepkg -sr --noconfirm
...
real  25m 54.715s
user 145m 51.435s
sys   14m 35.756s
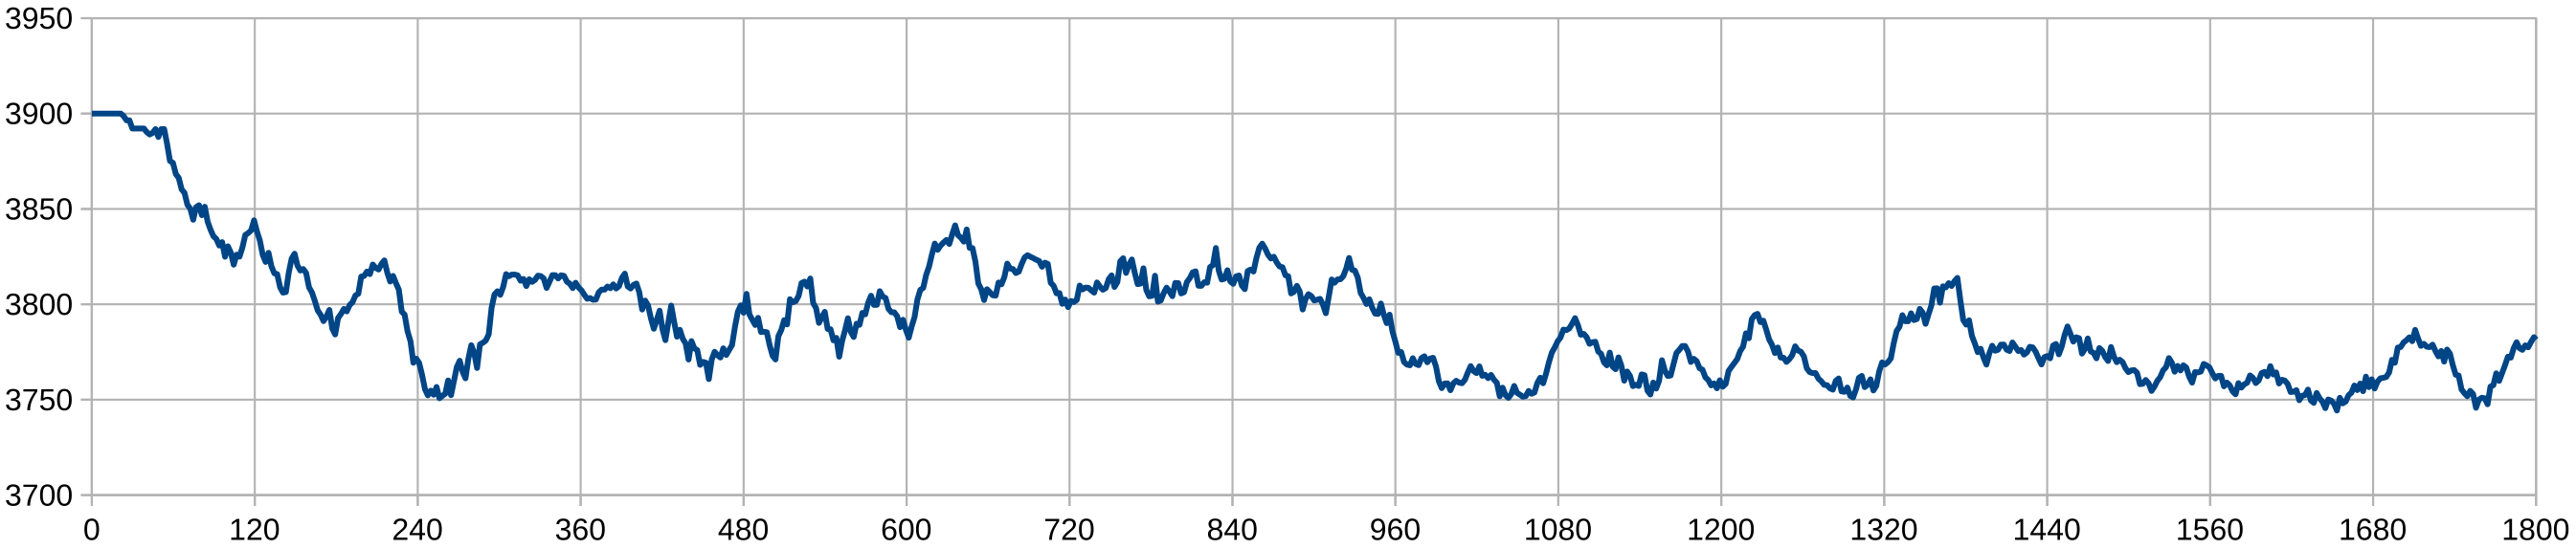
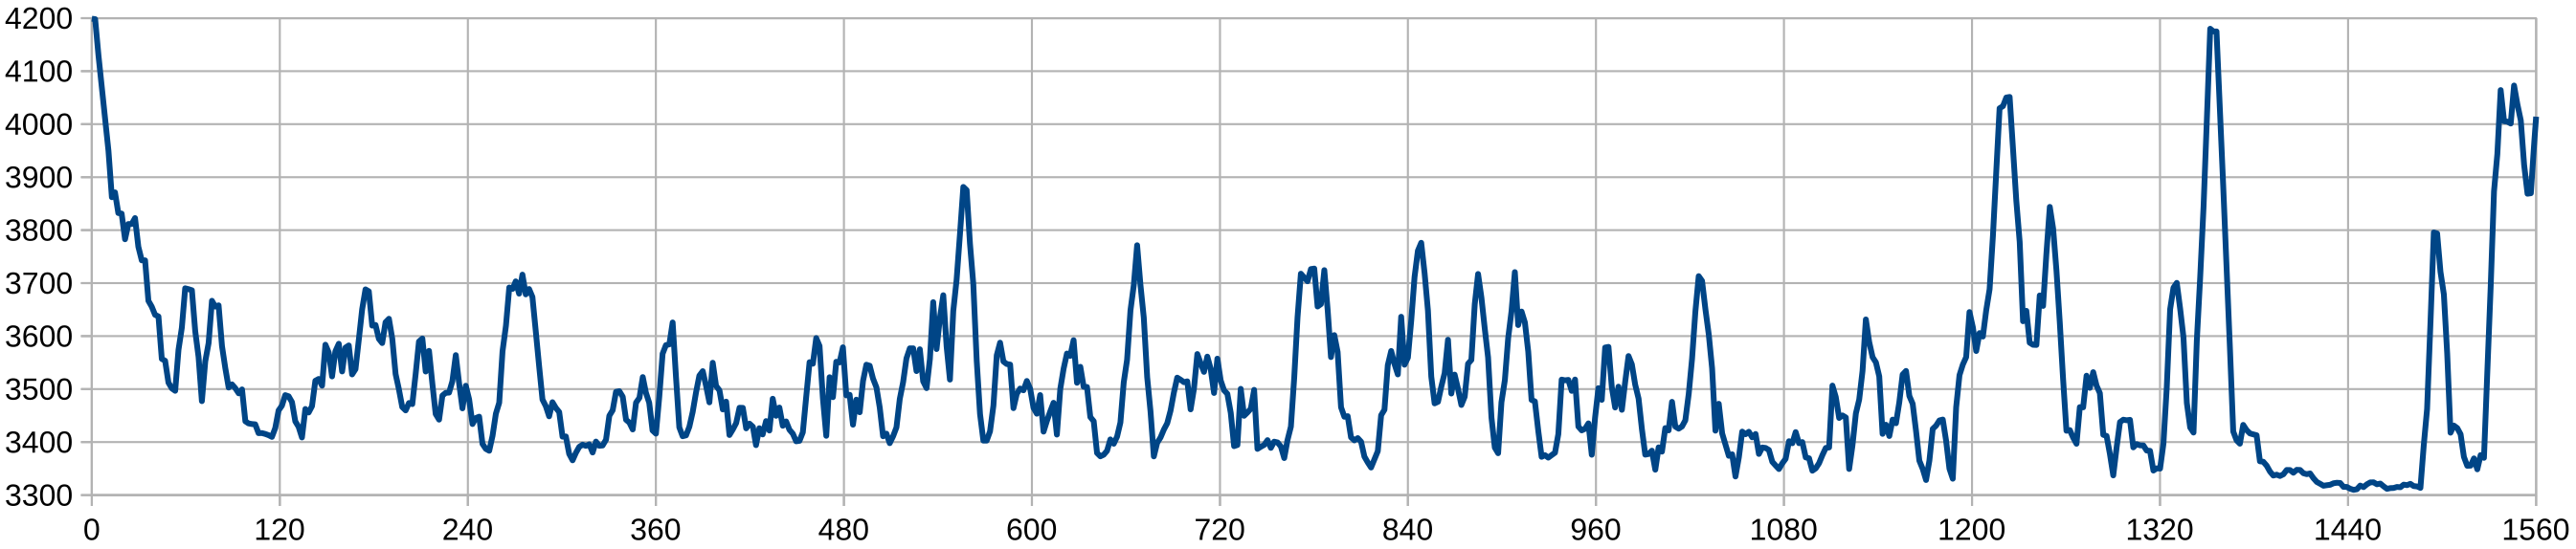
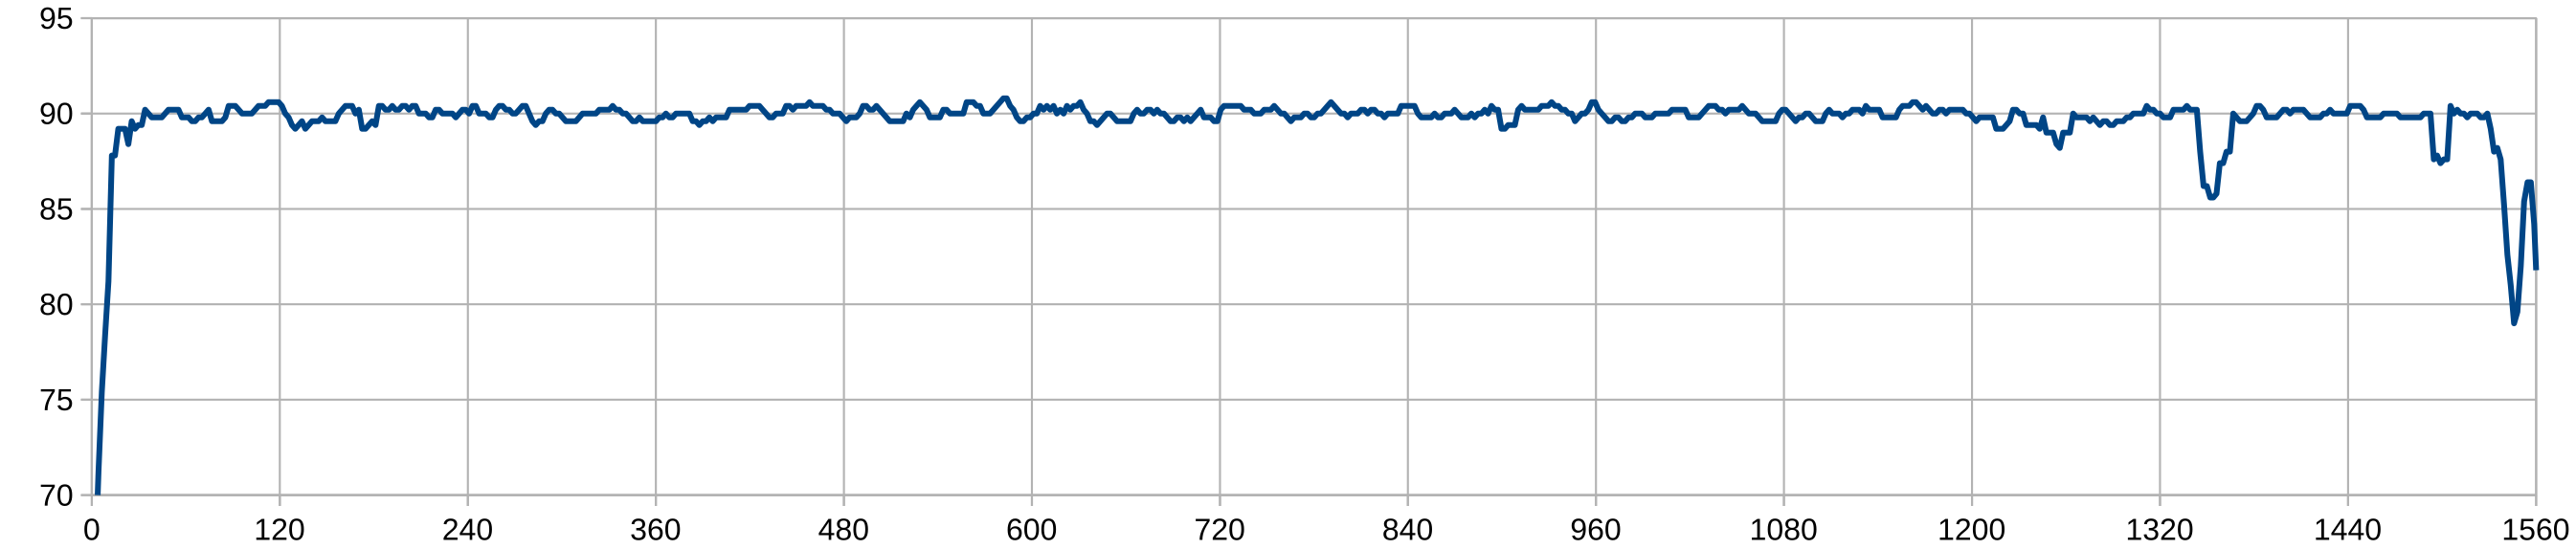
Building the package took 25 minutes and 55 seconds. The plots of frequency, power, and temperature versus time are presented below.
Under regular heavy workload CPU is able to work at 3.5-3.8 GHz consuming 30-35 W at the same time.
After reducing the temperature limit to 90°C, the building process took slightly more time: 26 minutes and 23 seconds. The plots of frequency, power, and temperature versus time are presented below.
real  26m 23.330s
user 153m  0.870s
sys   15m 16.693s

Conclusion
Eliminating the power limit allows quad-core CPU to work at high frequency. The only limitation left is temperature limit which controls everything, so you can reduce the limit in order to keep sane and safe temperatures under high load slightly reducing the performance.
In fact, quad-core ULV CPUs can be even faster than 7th gen HQ CPUs, but they require a proper cooling and some configuration, whose availability strongly depends on notebook manufacturer.
Thanks for reading!